August 31, 2008

August Team wrap up!

Our August blog promotion was Crafting with kids which brought some crafty projects as well as some touching sentimental stories from members and good reasons for crafting with kids. WabisabiBrooklyn gave us a nice top ten reasons to craft with kids taken from our own member's experience, EcoKate showed us a nifty how-to finger knit, FineArtist shared memories of encouraging her daughter to draw and paint, and MayLuk showed us a great quicky way to transform lonely gloves you might find without a matching pair into great finger puppets and even pen cozies! Our blog traffic has been great - continuing to increase - keep those tutorials coming!

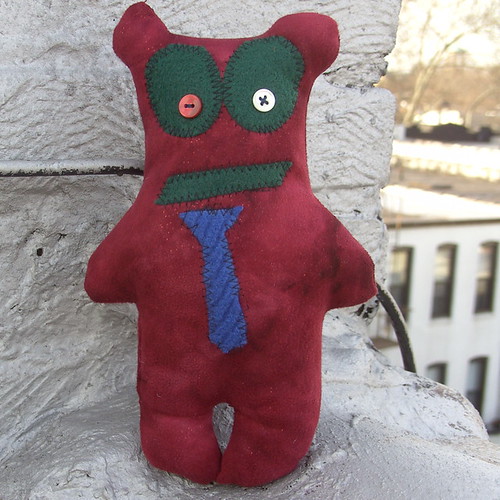
Also - Go check out our Team Members submissions's into Etsy's Handmade Kids Sweapstakes - You can vote for KarensMonsters in the Toy category and LittleLoveBlue in the Eco-Friendly Category - go show your support for the frog and elephant!

Press
Great Month for press for us - remember when you are in the press email it to the Team flickr account to be included on the press page
August 26 - Craftzine picks up MayLuk's project ideas of what to do with one odd glove.
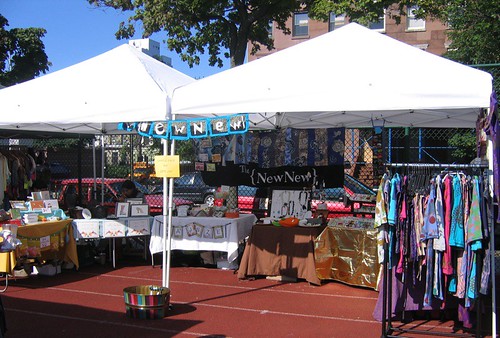
August 19 - The Brooklyn Flea blogged about our Supply sale!
August 18 - The{NewNew}'s Supply sale on NY Newsdays shopping blog Cheap Thrills
August 15 - Pulp Sushi on Absolutely Delish
August 15 - LoveForever's on DesignSponge for her new book Complete Embellishment.
August 14 - LoveForever's new book reviewed on NotMartha.
August 12 - Craftzine picks up EcoKate's tutorial on finger knitting
August 4 - MetalSugar on Modish!
August 4 - Craftypod reads Kayte's book of LoveForever on embellishing.
August 1 - The Brooklyn Indie Market did a nice write up about us on their blog.

Live + In Person!
We integrated more new sellers into our Brooklyn Flea Rotation: Wishbyfelicity, DHdelectable, and knitknit.

Our own KMStitchery's design were featured at the 7th Street Fashion Show on August 3.

A small group of sellers made a road trip down to the Philadelphia Independent Craft Market! CharlieandSarah, KarensMonsters, KimmChi, Fubabee all made it down for one day of bands, beer and crafts.

MShoelace was in an exhibition called Cherry Bomb by Sadie magazine.

Also we had a very successful supply booth at the Brooklyn Flea Aug 24 - look for more on that in future.

HowTo's!

Our own KnitKnit did a video tutorial with the Etsy Labs - awesome!
_________
Check back in September 1st for our First Team Monday Giveaway.

On September 13 - we'll be driving up to Beacon for our Handmade Cavalcade Craft Fair.

We have also secured a date for a shared Virtual Trunk Show with other Regional Etsy Teams for November 10-14 - mark your calendars!

And keep an eye out for a sock monkeys for Charity event at Etsy on October 25.

-Kimm
KimmChi.etsy.com

August 30, 2008

Monster Making How-To

This is a great project to do with kids or by yourself. Please use your own discretion for how much you allow a child to do. But from my experience, they love to make something come alive from choosing fabrics and a shape to decorating and naming.

What you will need:
Two pieces of fabric, or one folded in half
Sharp Scissors
Fabric Pencil/chalk
Polyester Fiberfill or fabric scraps
Sewing Machine (optional)
Needle & Thread
Pencil, pen, or chopstick
Decorations: Anything! Fabric scraps, ribbon, buttons, felt shapes, fabric paint, glitter
Glue (optional)

Step 1

Have your child draw a picture of a monster shape (simple is best).

Step 2


With a fabric pencil, draw the shape on the wrong side of the fabric however large you wish it to be when finished.

Step 3

Place the two piece of fabric together or fold one piece of fabric (right side in). Pin the two pieces together to keep them from moving as you cut.

Cut out the monster shape leaving approximately 1/4 inch seam allowance around the drawing. Don't worry about being perfect, monsters like to be a little messy.

Step 4


Decorate the right sides of the monster, don't forget to add decorations to the back as well.

Use whatever you have at home. Go on a treasure hunt to find great things to adorn the monster. You are only limited to your imagination

For young kids, gluing and drawing (with permanent markers) is easiest. For older kids they can cut out shapes and scraps and sew pieces on to the monster.

If you use paint or glue, it's best to let it dry completely before moving on to the next step. Alternately, you can wait to decorate until after Step 8 so you won't have to wait for the glue to dry before finishing the monster.

Step 5


Pin the two pieces of monster shape together, right side in.


Sew along the line you drew in step two, leaving a straight section open (we'll use that to turn the monster right side out). It's best to use knots or double stitch the section right around the opening.

Step 6


Cut small snips on the curves, snip off corners, and cut darts at sharp indents.
Be sure to cut only 2/3 of the way into the seam allowance and DO NOT cut the seam. This is easiest if your scissors are very sharp. On very rounded seams, the more snips you make, the more curvy the seam will be when turned right side out.


Turn your monster right side out through the opening. A pencil or chopstick is an excellent tool for making sure all the appendages and curves fill out.

Step 7


Using polyester fiberfill, stuff the monster. Use small amounts and start by filling in the furthest reaches and appendages first before filling the main body cavity. Again use the pencil or chopstick for this.

A greener alternative is to use fabric scraps cut up small instead of fiber fill. For tight places, make sure the scraps are very small.

As you fill the monster, squeeze the monster to make sure you're not over-filling or under filling the monster.

Step 8


Tuck in the seam allowance in the opening and use a slip stitch to close the hole.


Step 9


Name the monster and commence playing!


----------
By Karen
of Karen's Monsters

August 29, 2008

Where to Find The {NewNew} on Aug 31

With the final weeks of the summer ahead - and September just 3 days away - get out there and support your local Etsians!

The Brooklyn Indie Market will be closed for the Holiday - but the Brooklyn Flea will be welcoming all you back to schoolers. Go shopping with the {NewNew} for unique silkscreened apparel from BetterThanJam, British inspired apparel from CharlieAndSarah, and original artwork from DHDelectables.

G to Clinton/Washington. More directions here.

-Kimm
KimmChi.etsy.com

Crafting with Kids: Lessons in Aesthetics and Life

For children, there are seemingly limitless benefits to participation in art- and craft-based activities: learning to observe and process the world around them, healthy self-expression, manual dexterity, right-brain activation, problem solving skills, a developing aesthetic awareness, and social interaction being only a few examples. As adults, we may consciously choose to engage children in artistic pursuits in order to help them learn and grow. Or we may selfishly choose to craft with kids for the many lessons they unknowingly offer in return.

While we adults are largely focused on our fast-paced, get-ahead lifestyles, thinking of product over process, children are rooted in the present: the sound of a crayon mark or brushstroke, analyzing the consistency of glue, or creating a perfect arc. Alternately rapid and deliberate, the results express feelings over thought, and may ultimately lead to the perfect merger of the two. The physical actions of crafting, for kids, are as exuberant and spontaneous as the end results. Paint drips, gobs of glue, and glitter on the floor seem annoying to the adults in charge, but how can you measure that against creative joy? Instead we should give ourselves the license to act like kids – focused, intuitive, playful, even excessive – and give up our predictable and formulaic solutions to aesthetics and life.


by Sarah K. Warner

August 27, 2008

Top 5 reasons to Craft with Kids: #5


The fifth in our five-part series on the Top 5 Reasons to Craft with Kids comes to us from Allene of allenelaspina:

Every Christmas we made sure we did crafty stuff with my Mom and my sister:
we always made decorations for the tree (paper circles that link together
as "guirnaldas"); threaded together popcorn garlands; and made Santa and Mrs. Claus from toilet paper rolls. We would dress the cardboard cylinders
with red crepe paper and cotton. It was great to bond with each other and
it also helped me realize from an early age that we all have different
takes on things and at the same time if we work together we can come out
with a beautiful product.

I think in general, having done so many crafts as a kid has helped me
strengthen my visual skills and my strategies to problem solving.
It's good to realize that I can use my hands and my brain to create things.

August 26, 2008

Top 5 reasons to Craft with Kids: #4


Today Stephanie of bungaloe reminisces about the importance of crafting to her when she was a kid, her early crafting influences, and the way helps her keep connected to her family even though they don't live nearby:

My mom went to fashion school in Manhattan at age 30, when I was about 2
and my brother was about 8. She had one of the rooms in our apartment solely
dedicated to sewing and I can remember almost everything in there: the worktable my dad built her, the sewing cabinet, the spools of thread and the pattern paper hanging from the wall ( I loved the sound it made when I crinkled it! )

I remember hand sewing little pieces of fabric together at my nanny's
house with my aunt and being mesmerized at how the pieces looked when
you turned them right side out to form a pillow or mini quilt.

My dad painted, my bro liked to draw and I picked up a love of drawing
as well. Eventually I ended up going to Pratt for college. Although
I dropped out and started working in offices, I kept drawing and
painting and designing screen prints for clothes. Now it's come full
circle: At the age of 30 I started calling my mom and telling her I
want to make my own clothes. I thought it was too late for me until
she told me that she was 30 with 2 kids when she went to fashion
school. I'd had no idea - I thought she'd gone to school at 24.

Recently my parents, and my brother -along with his wife and kids - moved to Myrtle Beach. I miss them sooooo much and really wish they were still here in New York.But at least I have really great memories of us all being creative in our own ways. I love having sewing and fashion in common with my mom. I feel that we have a very special bond, no matter where she lives.

August 25, 2008

One Forlorn Glove to Five Finger Puppets

This is a very easy project and the possibilities are endless.

What you will need:
-Left-over used gloves
-Scissors
-Glue
-Pompom
-Ribbons
-Bits of felt
-Beads
-Needle and thread


Five digits from one glove = 5 finger puppets!


When you are done with playing with the puppets, they can be turned into marker cozies.


The finger-less glove is still good for working in the cold weather.


Send in your creative samples if you have any.

- May Luk, MayLuk.etsy.com

August 22, 2008

Where to Find The {NewNew} on August 23+ 24

Saturday: Shop for your new fall gear at the Brooklyn Indie Market this Saturday - 11am to 7pm - corner of smith and union under the striped tent! Shop through Fofolle's feminine skirts and WabisabiBrooklyn's vintage inspired decoupage jewelry. MayLuk's handmade ceramics will also be under the tent this weekend - dinner plates and bowls in fun colorful designs - a perfect addition to your table.

And Sunday will be a big day for the {NewNew} as we virtually descend on the Brooklyn Flea! We will be busting out of our normal 10x20 foot spot by the fence to include more spots on the side to sell our craft supplies! Cleaning out our clostes, just in time for you to stock up for your Fall projects. We'll have paper, jewelers supplies, craft books, fabric, sewing supplies - you name it, we've got it!

In our regular booth by the fence on we'll have handmade soap by NordeaSoaperie, jewelry by Jantar, knitted jewelry and felted bags by KnitKnit, gemstone jewlry by Yaniamor, colorful tile coasters by LittleTileGnome, and silkscreened dress, tops, bags and other accessories by BetterThanJam.

Also with CharlieAndSarah having their own 10 x 10 right next door!

G to Clinton/Washington. More directions here.


-Kimm
KimmChi.etsy.com

August 21, 2008

Plants & Edibles

For more Accessories from the Metro New York area - search: newnewteam, plants, edible on Etsy


Craque Rock Shop - This is a passion project for sisters Freida & Maxine Orange. The candy is based on a traditional southern treat made by our mother Marsha's childhood best friend, Sandi. Freida's love affair for the candy extended to college and into adulthood...and it continues to grow and expand with new flavor combinations and custom packaging.


Izile - An aspiring artist, I am constantly trying my hand at new media. I tend to be all over the place and find it hard to settle just on one type of art. Over time, I expect to have jewelry, oil paintings, ACEOs, watercolors, altered books, and who knows what other oddities I might churn out.”

The {NewNew} E-mail Event Newsletter

The {NewNew} York Etsy Street Team Now has a nifty e-mail newsletter for you locals to keep track of our upcoming events.

Our next event being on Saturday, Sept 13, 1 - 8pm, The Handmade Cavalcade
Main Street + N. Cedar in Beacon, NY
Look for further event announcements for our Team hosting a Holiday show...


Fill out your e-mail address
to receive our newsletter!

August 19, 2008

Top 5 reasons to Craft with Kids: #3


Reason #3 in the Top 5 Reasons to Craft with Kids comes from Lisa of fubabee:


My mom used to work at home as a seamstress, and I have fond memories
of when I was 3, sitting next to her in the evenings while she sewed
pieces together. She used to give me the kraft paper between the
stacks of fabric and encourage me to doodle with my crayons (which
were safely stashed in a round, blue danish cookie tin). I can still
remember how I used to draw people back then.

When I was 6 years old, I sat in an art class in school drawing trees
that resembled circles and sticks. My art teacher came up and guided
me to look closely at how trees are shaped, and made a few strokes on
my paper. What seemed like a simple instruction of how to draw
branches forever changed my perception of how to draw. I don't
remember the name of my teacher, but I can remember the profound
impact it had on me as a child and how it gave me the confidence to go
out and draw everything I saw.

Recently I was at the office of this youth organization I used to
volunteer for. A little 6 year old girl was waiting for her
older brother to pick her up. She sat at the computer with a drawing
program opened. I watched her play around with the program, and sat next to her to give her a
tiny bit of instruction on how to color and add text in. From there she sat, totally immersed in the world of coloring her panda bear and typing in "I love panda bear" until her brother came to pick her up.

The importance of crafting with kids doesn't necessarily have to do with the craft itself. Rather, it teaches adults how to be patient and giving, and it teaches kids how to be confidet in their creativity and imagination.

-MaryAnne
wabisabibrooklyn.etsy.com

wabisabibrooklyn.com

August 15, 2008

Crafty things to do with kids in NYC

photo: BeaconBookmarks crafting at the Brooklyn Indie Market

And if your looking for something crafty to do with kids this weekend in New York city, check out the Nature Crafts at Prospect park on Flatbush Ave. at Eastern Pkwy. in Brooklyn, every Saturday and Sunday from 1 to 3pm at the Audubon Center. Staff lead informal drop in craft sessions for kids using all natural materials.

Saturday in Bryant Park is the Camp Klutz Craft Bonanza from 12 to 1pm with all sorts of crafting things planned.

And on Wednesday night from 6 to 7.30, in McCarren Park, The Brooklyn Children’s Museum‘s will be hosting an American Indian Night with free kids hour with crafting dream catchers and singers!

And if you are in to planning in advance - September 25 at Shea Stadium is hosting Stitch N Pitch (catchy isn't it!) a day at the park to knit, crochet, embroider, cross-stitch and needlepoint, with experts on hand to help teach the young ones - raising awareness for the Needle Arts Mentoring Program.

Do you have any other tips for city activities with kids?

-Kimm
KimmChi.etsy.com

Where to Find The {NewNew} on August 16 + 17

Saturday, Aug 16: The Brooklyn Indie Market will be in full swing under their stripes tent on Smith Street from 11am to 7pm. Fofolle's feminine summer skirts will be on display this weekend.

Sunday, Aug 17: Rotating in this week at our booth at the Brooklyn Flea will be KnitKnit, MShoelace, AllenelaSpina, LittleTileGnome, WaiSze, BetterThanJam.

August 12, 2008

Top 5 reasons to Craft with Kids: #s 2.1-2.3


Next up in our Top 5 reasons to Craft with Kids, Danielle of Collective Elements had three bits of wisdom to add to the discussion:

1. My daughter's artist talent is already asserting itself at age six like mine did. But unlike 35 year old me, she has fewer boundaries. It's not about what looks good, its about what she likes. She teaches me to let go when creating.
2. Some crafts are for fun and then some I use as vehicles to explain
things to her. Like making the solar system out of construction paper
or counting out items needed for projects. Math and science figure in
heavily when we have to measure things for painting and soap making.
Crocheting and card making improve hand/eye coordination.
3. Being a single mom with a full-time job and a part time business, it can
be hard to have mother/daughter time. So crafting is bonding time
between us. Since we both love art, we get to have fun and laugh and
giggle.

-MaryAnne
wabisabibrooklyn.etsy.com

wabisabibrooklyn.com

August 9, 2008

Finger-Knitting Good!

Get ready for a fun and easy project to take on with a kid or two: the wonderful craft of finger knitting!

Finger knitting is simple and enjoyable. It also allows for a bit of imagination and ingenuity on the part of the finger knitter, as it is up to you what you'll be making your finger-knitted piece into. Here are a few suggestions about what you can make with finger knitted projects:

> Fun skinny scarves of many lengths, colors and styles.
> Key fobs/lanyards.
> Necklaces
> Bracelets
> Belts
> Use your imagination!!!

OK, here's what you will need to begin the finger knitting process:
- Some type of yarn or thick string
- Scissors
- Crochet hook
- Willing and able fingers!

Now here's how you do it:

1.) Take your yarn and weave it around the 4 fingers of your less dominant hand (i.e. if you're right handed, weave the yarn around the front and back of your left hand's fingers) minus your thumb. There should be yarn around the front and back of each of those 4 fingers.


2.) Now take the ball end of the yarn (part of the yarn that's connected to the ball of the yarn), and lay the yarn strand over the fingers that have the yarn weaved around them.


3.) Starting at one end of your fingers, pull the part of the yarn that's around your finger over the part that's laying on your hand, and to the back of the hand. The part that was laying on your hand will remain on that finger. Repeat this to the end of your fingers.


4.) Again lay a strand of the yarn over your hand and repeat the steps in #3 for every additional row.

5.) Continue with step 4 until you reach your desired length of finger knitting. Keep in mind that you should pull on the beginning of the work to determine how long the piece is as you're going, and continually do that to check on its length.


6.) When you've reached your desired length, simply bind off! All this involves is taking the loop that is around your pinky finger, transferring it so that it's around the ring finger, and passing the lower loop that's around the ring finger over this new loop. Then take the remaining loop on the ring finger, transfer it to the middle finger, pull the loop that's on the lower part of the middle finger over this new loop. See where this is going? Do the same thing with the last finger so that you have just one loop remaining on your index finger. Cut the yarn free from the ball, leaving a bit of a tail (a few inches long), and then just pull the tail through that remaining loop to secure your work.


7.) Your crochet hook comes in handy here because if you want to hide those end tails at the beginning and end of your work, you simply weave them into the stitches of your finger knitted piece with the crochet hook.


Or conversely you could leave them and tie extra bits of yarn on the ends for fringe if you prefer.

I apologize for having to spell this out. I had originally taken video of how to do this but it would not import to my computer! If anyone has questions please leave them in the comments! Another great resource for finger knitting how-tos is youtube.

Here are a few examples of finger knitted pieces I've made:
Skinny Scarf

Multicolored skinny scarf.

Enjoy the fun and exciting world of finger knitting!

-Shutterkate