February 27, 2010

Artistic Process: How did you learn the discipline you work in now?

Pulp Sushi
"I've been searching for my creative outlet since middle school. I'm drawn to creative people and keep myself surrounded by them. I tried my hand in a few different things before I fell into jewelry. I didn't want to do jewelry, I wanted to find my nitch in soaps and candles but the interest didn't stay. I opened my Etsy shop "just to see" if anyone noticed. I never anticipated having a business. I sold a few customized notebooks and marble magnets before I transitioned to jewelry. I am self taught with the help of books and online tutorials. The more ideas I get the more confidence I gain in my work and the more clearer my goals for my business become."

-Marilyn
Pulp Sushi

February 26, 2010

Where to Find the {NewNew} February 27 + 28


The Brooklyn Flea lives up to its reputation as the best artisan market in NYC as it continues on at its winter home at One Hanson. Filled with talented vendors and enticing food, you won't be disappointed with the rich variety of products and designs. This Saturday, {NewNew} artisans Mulry Jewels, Vyphuis Designs, and Fernando Jewelry will be selling and on Sunday check out Wish By Felicity, Yania Creations, and The Chocolate Muffin.
Location: One Hanson Place, Brooklyn. Saturday and Sunday, 10am - 5pm.

The 2nd Annual Social Pariah Festival
PulpSushi will be at this alternative arts and music festival in the Hudson Valley. With over 40 alternative vendors, tattoo artists, live performances and bands from the local area and the tri-state area, this festival was created to show off the vast wealth of Hudson Valley talent. $5 admissions which will go to benefit the Pitch For Kids Funds (http://pitchforkids.org/). Must be 18 or older to be admitted.
Location: The Holiday Inn, 542 Route 9, Fishkill, NY. Saturday, 11am - 9pm.


Karina

February 24, 2010

Artistic Process: What inspires you?

Felt It
"My inspiration comes from my daughter and her books. Children's books are an amazing resource of inspiration."

-Anne
Felt It

February 23, 2010

Thing-A-Day 2010 Edition: Week 3

Winter persists in the city, but the Thing-A-Day project marches on. Here are selected images of week three's progress by {NewNew} members:
The Dime Rests
Warpe Design: Thing-A-Day / Etsy Shop
The Birds
WabiSabi Brooklyn: Thing-A-Day / Etsy Shop
Pepe's Village
Virginia Kraljevic: Thing-A-Day / Etsy Shop
Glasses
Saru Star: Thing-A-Day / Etsy Shop
Joey Ramone
My Coney: Thing-A-Day / Etsy Shop
Flickr Pro
mellowbeing: Thing-A-Day / Etsy Shop
Scans of things I'm giving to the Goodwill
Look Closely Press: Thing-A-Day / Etsy Shop
Manatee Cards
little bunny: Thing-A-Day / Etsy Shop
Puppet Kitchen Puppet Scarf
Ikyoto: Thing-A-Day / Etsy Shop
Executive Bag
Groundsel: Thing-A-Day / Etsy Shop
Orange Flower on Turquoise on Green Baby Bodysuit
Felt It: Thing-A-Day / Etsy Shop

We're over the hump!

~Kari
http://ikyoto.etsy.com/

February 22, 2010

Preparing for Spring


Do you have the winter blues? After coming out of a busy holiday season, how does a vendor get motivated at a time when people really don't need anything, and have no money or interest to buy. My answer is to try to stay optimistic and plan for the spring. Remember, those who look and don't buy, very well could be your future customers.

Plant your bulbs for the spring! It will get better. There are so many things to accomplish during this period. Make it easier on yourself and do these things now!

I have put together some tasks I want to complete now to get ready. Hopefully my list will help you.

  1. Show schedule:
    Do you sell at craft shows and street fairs? If so, you must prepare now. Here are a few tips:

    1. Look at the applications you have received. Divide them into shows you have participated in and those you have not. Now, for the ones you have, get out your numbers from last year and see just how much money you made. Determine if it is worth doing again. Maybe you share that space this year. Remember to consider what the weather conditions were that day when deciding for this year.

      For the shows you did not do, talk to others who may have participated. If you are a member of an Etsy street team or a similar organization, contact your fellow members and ask them about their experience. Don't do a show without doing the research! I have had some very bad luck in the past.

    2. Get yourself a calender just for your show information. I find it very helpful for scheduling and keeping track of my numbers at a glance. After each sale I record sales and expenses.


  2. Show Set-Up:

    1. Think about what you will need for the outdoor set-up. Is your tent still in good condition? Did you have the proper weights for those windy days? For a quick cheap solution, go to a home improvement store and buy sand and those white paint buckets. Add some rope to attach to the tent and your new weights will work like a charm.
    2. What is your table situation? Do you need a better table? Fabric for your table is very important. Very possibly it needs to be washed or replaced.
    3. Transportation: This is especially important if you don't have a car. Some car services can be much more expensive than others. Compare prices now. If you rent a car, also compare rates and rent early.

  3. Graphics:
    There so often are things we need and want. Take the time now to prepare them. I made a brief check list:

    1. logo
    2. business cards
    3. postcards
    4. brochures
    5. product cards
    6. signage
    7. banner

  4. Photos:
    Get good photos of your work. So often we don't have them when we need them. Make sure to document all of your work. Also don't underestimate how important it is to organize the photo files on your computer.


  5. Inventory:
    Sometimes when it is not busy, it is hard to imagine that you will run out of items. But you will! Stock up now. There are two areas you need to inventory. First, your supplies and second your finished products. Even though it may be difficult to lay out the money now, in the long run it is usually better. Now your purchases won't be rushed and you can shop around for better pricing.

  6. Web:
    1. Update your website and Etsy shop. Make sure your new show schedule is on there. You don't have to post all your pictures now, but get them ready to post regularly.
    2. Set up and maintain your social media sites like Facebook, and Twitter.
    3. If you don't have one already, consider a professional newsletter service, for example Constant Contact.
    4. Make sure your mailing list is up to date.

  7. Learn New Skills:
    Take the opportunity during this down time to learn something new. Maybe a new technique to apply to your work or a computer skill to help you with your business. Also, attend some seminars. There are plenty of free and inexpensive small business seminars out there!

I'm starting to feel like I'm actually busier at this time than when it is the busy selling season. Remember, stay positive and productive. Spring is just around the corner.


-Joan
www.citybitz.etsy.com

(photo by JT Stitches)

February 20, 2010

Artistic Process: How did you learn the discipline you work in now?

warpeDesign
"I went to the Rhode Island School of Design for my BFA with a major in Textiles. One of the most fun courses I took there was called "Off Loom Techniques". It was all about how fabrics are created without big mechanical equipment like looms and knitting machines. We learned the basics of fabric creation techniques using the most primitive materials - dying with tea leaves and cochineal (bugs), spinning raw wool and camel hair with a drop spindle, applique, pleating, braiding.... It was all about experimentation.

A couple years after I graduated when I was working at a mill where I spent all of my creative time developing on a computer, I'd come home with itchy fingers craving immediate tactile connection to my work. I didn't want to make fabric - I got enough of that at work. So I started experimenting with paper. It was nearing the holidays... so I drifted into making holiday cards for my family and friends. That
first year I wove them. The next year I did cut outs. The following I dyed them... and it goes on. I've now been hand-making holiday cards for almost 15 years. It always starts with a blank white 4bar card. That's the only common thread.

The latest "punctured paper" look came about after a trial with embroidery. I hated what I'd done, so I pulled the threads out of the paper... and revealed the fascinating punctured surface below. I picked up a pin and started attacking the white cards around me. After making 100 cards... I realized I needed to unload some and decided to try my hand at etsy. And warpeDesign was born.

-Luise
warpeDesign

February 19, 2010

Where to Find the {NewNew} February 20 + 21

While you're waiting for the weather to warm up for the outdoor markets, check out the best NYC indoor winter market this weekend. The Brooklyn Flea continues to attract huge crowds at the beautiful historic building at One Hanson. This Saturday, {NewNew} artisans WishByFelicity, Meekiyu, and FernandoJewelry will be selling and on Sunday check out NordeaSoaperie, YaniaCreations, and TheChocolateMuffin.

Stay warm!


Karina

February 17, 2010

Artistic Process: What inspires you?

mellowbeing
"Color. Mixing colors, seeing how they work together, seeing if they create a lot of contrast or just accent each other. It's all about seeing combinations. Color inspires a lot of what I do in any creative medium. I tend to gravitate towards brighter, more lively colors because I believe it's nice and easier to add a "pop" of color to something simple (say an outfit, room, etc.) than it is the other way around.

When it comes to knitting, the utilitarian aspect is the 2nd characteristic that inspires me. I want to use a fiber that is useful to the recipient so that they can get the most use out of it for as long as possible. In this case, a 100% wool yarn is perfect because it keeps you warm and has high durability in the Fall/Winter. Cotton is awesome for warmer Spring times. The 3rd would be texture and quality. A lovely, soft skein of alpaca yarn just screams to be stroked and you know you want it close to the skin. It's why I love making alpaca knit items when I do get the chance (alpaca can be pricey so that's a con)."

-Jen
mellowbeing

February 16, 2010

Thing-A-Day 2010 Edition: Week 2

February has a way of flying by, and the Thing-A-Day project is also halfway through. Here are selected images after two weeks of progress by {NewNew} members:

Tiny Carrot Brothers
Warpe Design: Thing-A-Day / Etsy Shop
VooDoo
WabiSabi Brooklyn: Thing-A-Day / Etsy Shop
Loverne and Marvel
Virginia Kraljevic: Thing-A-Day / Etsy Shop
Joey Potter
My Coney: Thing-A-Day / Etsy Shop
Day 9 & 10
mellowbeing: Thing-A-Day / Etsy Shop
Hammerhead Study
little bunny: Thing-A-Day / Etsy Shop
Takarazuka Eyeglass Brooch
Ikyoto: Thing-A-Day / Etsy Shop
Felt Applique Foot
Felt It: Thing-A-Day / Etsy Shop
Folded Flowers
Collective Elements: Thing-A-Day / Etsy Shop

Let's see how many of us make it all of the way through!

~Kari
http://ikyoto.etsy.com/

February 13, 2010

Artistic Process: How did you learn the discipline you work in now?

Paperelle
"Like so many of you I'm a dabbler! My mom is very artistic, so I learned a lot from her- machine sewing, decoupage, stenciling, painting, etc. My grandma tried to teach me to knit, but it didn't stick. A roommate taught me when I was 20, and I then taught myself to purl from a book, and taught it to her. (We made a lot of garter stitch scarves with wonky increases!) Right now I'm trying to teach myself crochet. I pick up different techniques here and there mainly to help out with my costuming hobby. When you have a limited budget the creativity and broad range of crafting experience helps a lot. (If you need a 10' tall wearable puppet made out of plastic bags, duct tape and soda cans I'm your girl.)

Currently I sell a lot of origami jewelry in my etsy shop, and I supplement that at shows with one of a kind assemblages. I saw a tutorial online for the origami stars that I make, and quickly became addicted. People say "oh, you must be an origami expert", but that's not the case. I'm really good at one fold! I can't do a crane,
despite many attempts. Don't even ask about that poor, poor butterfly. I came up with my own technique to make the paper stars into jewelry, which is something I just picked up along the way."

-Lauren
Paperelle

February 12, 2010

Where to Find the {NewNew} February 13 +14


Valentine’s Day can strike dread in the heart of the hardiest New Yorker: If you’re coupled, there’s the delicate dance of aligning your own celebratory expectations with those of your beloved; if you’re unhappily single, all the emphasis on romance can be special kind of torture. In response to this, Brooklyn Indie Market and The {NewNew} are joining forces to present “A Valentine Fling: A day of fun flirting, and handmade shopping on Smith Street.”

Location: Starting Artists, 211 Smith Street. Take the F to the Carroll Street Station (G train not running). Saturday, 11am - 6pm.


The {NewNew} returns to the Brooklyn Flea at One Hanson this weekend, with another great lineup of fabulous vendors and fantastic food. This Saturday, {NewNew} artisans includeMuppetloon, WishByFelicity, and MulryJewels, and on Sunday check out ApertureAgog,YaniaCreations, and WishByFelicity.
Location: One Hanson Place, Brooklyn. Saturday and Sunday, 10am - 5pm.


February 11, 2010

Book Review: Applique Your Way by Kayte Terry


{NewNew} alumna Kayte Terry published her second book last fall entitled Applique Your Way. With this book she dives more deeply into an embellishment technique she introduced with her first book Complete Embellishment.

The Contents
As so often, the first part of the book covers different applique techniques such as making templates, hand-sewn applique, machine-sewn applique and reverse applique. The instructions are pretty straight forward. Kayte is an advocate of hand-sewn applique because she enjoys the meditative aspect of the craft and the way it connects her with centuries of women using the same technique, but she also provides simple steps for machine-sewn applique.


The remainder of the book is filled with 35 projects divided into the categories: Wearing, Decorating, and Giving. Kayte designed the majority of the projects, and she also highlights ideas by other crafters including the refashioned flower tea towel by {NewNew} member Kristen of Cakehouse. (See if you can find Kimm of Kimmchi modeling some of the projects.) The patterns and templates you may need are nicely folded away in an envelope at the back of the book. Unlike other crafting books I've used in the past, you will actually be able to refold and store these templates without having to deal with an exploding envelope.

Layout and Feel
The book with its beige paper and matte pictures has a vintage feel to it. Many of the pictures especially in the Giving and Decorating chapters highlight 1970's dishes, fabrics, and knickknacks. Two features that I love are the fact that the book is ring-bound, if you open to a page it will stay open, and that there's a handy elastic strap that holds it all together should you use it as a place to hold your inspiration materials.

My Project
Before I review a book I usually make one thing out of it first. In this case, I didn't follow instructions. Instead, I was inspired by the Doily Trivets (on the left) and used them as a launch pad for something slightly different. For my trivet (on the right), I folded up a piece of felt and basically cut it into a snowflake. I then embellished it further with a few random embroidery stitches. For the padding I used some felted sweater remnants, stitched the whole thing together, and voila a square trivet.

For some ideas or to share your own projects, check out the Applique Your Way Flickr group.

Simone
groundsel.etsy.com

February 10, 2010

How To Make An Embroidered Valentine

I first learned how to embroider cards at an Etsy craft night and fell in love instantly. This is an inexpensive and easy way to give your partner, BFF, or Mom something uncommercial and handmade on Valentine's Day.

What You'll Need:

Card stock or blank greeting card
Embroidery or Sewing Needle
Scissors
Threader (optional)
Thimble
Embroidery Floss (cotton preferred)
Ruler
Bubble Mailer
Painters Tape
2-3 words to Embroider
Glue Stick
Decorative Paper for inside of the card (optional)

Once you decide what word(s) you want to use, the first step is to pick the right font to create your pattern. Type them into a Word program then play around with different fonts and sizes to fit your card. Keep in mind that you will be using simple, straight stitches to outline the word. Thin fonts are easiest to stitch, but you can also use a rotund font and stitch the outline. It helps to decide what will fit best by printing out a couple different choices.

Once you have picked the right font and size use a ruler to place your word and make sure it is straight. Once you are happy with placement, tape down the word to the front of the card with small pieces of painter's tape. Painter's tape will not stick to the front of the card so you can play with the placement if needed.

I have decided to add a simple heart cut-out to my card, then the embroidered word.

Next, open up your card and place the side you are embroidering on top of your bubble mailer.

We are now ready to punch the design into the card. This way, we can easily stitch the thread through the card all in one shot. I usually punch the holes about 1/8" apart, as evenly as possible. I am using a fat font, so I will do the outline of each letter. The hardest part of letters are in the curves. Around curves make the punches a little closer together to control the way the curve looks. You can always add a punch later if needed, so don't stress out about making this perfect.

To do the punch use a thin needle or straight pin to carefully push through the card to the mailer. It works best to hold the needle with one hand and push down the top of the head with the other. I like to wear a thimble for this to protect my finger.

Once you have punched all the letters carefully, pick up one side of your word pattern and make sure you didn't miss any letters. If you did, just tape it back down and keep punching. Once you are done, remove the pattern and you will be able to see the whole word clearly.

Woo hoo! Now we are ready to stitch, so let's talk about some basic stitches and thread options.
I recommend 6 string cotton embroidery because for about 39 cents you will use it forever and it works well moving through paper. This thread is made up of 6 strands and for outlining words you only need to use one or two strands. Cut off about 8 inches of the thread and separate out two threads and slowly pull down to completely pull it from the original strand.

Since we have separated the string sometimes it is hard to thread the needle. If you are a beginner I highly recommend investing a dollar for a threader to easily get the two strands of thread through your needle. Once you are threaded we are ready to stitch.

If you would like to do the whole word in one color use a backstitch. With this stitch you are literally going back through the hole of the last stitch you just did. Start by pulling your needle from the back of the card to the front. Leave a little bit of tail in the back of the card before you do your next stitch. Hold down the tail with your thumb for the first couple stitches. Do not tie a knot!

Back of Card:

Now you are at the front of card. Take your needle back through the next hole so your needle is now at the back of the card. Then from the back of the card come through the next hole to the front. Finally from the front, take the needle through the same hole where the last stitch was. You just completed a backstitch! Continue that same pattern through all the letters.

Another option is to do a straight stitch using two different colors to outline your word. With your first color threaded start at the back of the card and bring the needle through the front. Then bring the needle back through the next hole up and down through the card over and over again like below.


While you work, it is inevitable that you will run out of thread before completing the design. Some people recommend using a dot of glue or tape to hold down the ends, feel free to do that. I find it to be just as secure to stop the stitch at the back of the card with an inch or so left, then pull the excess thread through the stitches that you have already done in the back to hold down the end. All of the previous stitches will hold everything in place and it would be very hard for the ends to come lose through the front of the card.

Continue through all your letters until you have the word half stitched.


Now we'll thread our second color and do the same straight stitch. Start at the back of the card and pull the needle through the end of the first stitch. Then go back through the very next hole.

Back of Card:

Continue this way so the thread alternates in color.

Front of card:

When you first try this out, often you will get a dreaded knot in your thread. Don't freak! All you have to do is carefully push your needle through the knot and work it around in circles with a slight tug. Usually you'll be able to pull it out and happily continue on.

Another good tip is hold your thumb close to where you are pulling your needle through. This will help stabilize the paper and avoid tears. I usually keep my thumb a centimeter or so away from the hole I am pulling the needle through.

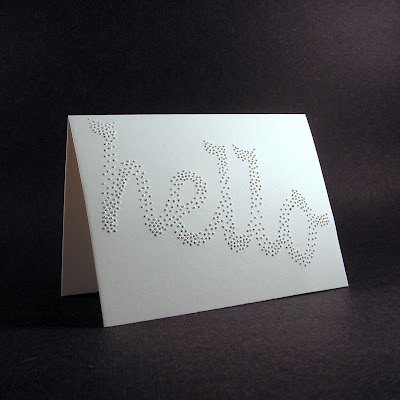
Once you are done, take a deep breath and enjoy your work. You just stitched a gorgeous handmade card. Nice! Some people choose to cover up the back of their card with decorative paper. If that works for you, go ahead and do that by gluing it on with a glue stick. I think it is awesome for people to see how the work is done. So instead of covering the back, I add some hand pulled paper on the inside but not over the embroidery. To do this just run a line of glue on the fold, press any decorative paper into the fold, then leave it underneath a pile of heavy books for 24 hours.

Finished card:
Have a lovely valentines day sharing your love with someone special.
Kelly
www.apertureagog.etsy.com