

 Monday Night at Etsy labs was a skill share on how to make pennant-style banners. And though our team has a brilliant banner that we created at the outset of our shared booth space at the Brooklyn Flea, it was great signage while our team spot was against the fence, but once we moved into the middle of the yard, we had no place to put the banner. So I thought it might be a great idea to take the quicky external cityscape banner i had made and learn how to make it into a couple of pennant-style banners that we could hand around the tents and really be eye catching. So the Etsy Labs Open Craft Night Project was perfect!
 They listed the project materials needed as: fabric, scissors, fusible web, an iron and sewing machine. So I brought this banner in hopes of revitalizing it into something that would be really eye catching amongst all the vendors at the flea and frankly didn't look so rough.
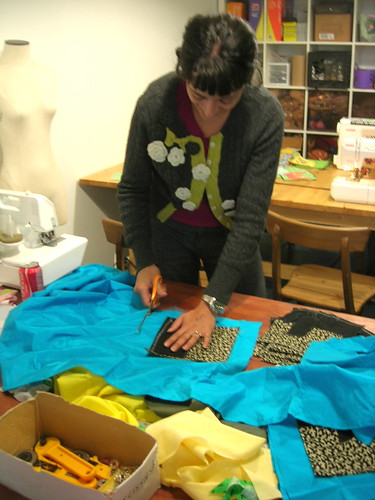
 STEP ONE
I cut up the existing banner (which was a 20 foot long applique of a cityscape). I cut pieces to be square as I thought that might be easiest to work with. This gave me just about 21 square which should give me three nice banners in the end.
STEP TWO
 I routed around my fabric stash until I found something that would be really eye catching against the black and tapestry of the original banner - you can't get more eye catching than bright turquoise (which I got at our last team swap). My challenge here was that my original slap-dash banner was inconsistent sizes height-wise, so I just eye-balled it here, laying the banner square on top of the turquoise fabric and cutting about two inches extra on each side. I pinned each together as they were custom cut to go together.
 STEP 3
Once all of those pieces were cut, I ironed the backing blue and ironed in the fold, and then another fold over to reduce any fraying and to get a nice clean line around the whole thing. I pinned each one of the seams in place to hold it before i popped over to the sewing machine to finalize the square.
 STEP 4
I ran over to their wonderfully fantastic MODEL OF SEWING MACHINE to zip around the seam and finish each square. Ah, it was so nice to qork on a quality sewing machine, that responded so well to a light touch on the pedal and went through a layer of canvas and two of fabric very easily.
They looks so nice and neat, i feel like I could attach them together and make a beautiful quilt. But we're not done yet! At this stage I ran out of time at the Etsy Labs and had to take my project home for the applique and final assemble portion.
 STEP 5
Now it's time for the applique. I used illustrator to finalize some typography and scale up the letters to fill the space on the squares. I ironed on the fusible web onto some nice bright white fabric that would really stand out against the bright turquoise background and the busy tapestry and skyline. I made sure to double each letter so that I can put words on both the skyline side and the flat turquoise side so that it will be readable even as the wind hits it.
I used the printed letters as a template and cut them out from the fabric and fusible web (making
 sure to reverse the letter before cutting them out). Then I just ironed them on for about 15 seconds until the web melts and fuses the two fabrics together.
Viola!
Look for this new VIBRANT pennant-style doublesided banner in the coming months The Brooklyn Flea!
3 comments:
Great job Kimm! Thanks so much for doing this!
Those squares look great - I can't wait to see it in action
Looks fantastic!
Post a Comment