I really looked high and low for something affordable, portable and pretty to display my jewelry when I am selling and decided to just make my own jewelry displays! I make more earrings than anything, so I was focused on something that could display my earrings in one or two places and not make my table look too junky.
I came up with picture frames! They are in every thrift store, and with my simple instructions, they can make really nice displays for your jewelry. Also, if you really like a frame to something and it's not a picture frame, say a mirror, the instructions are the same.

I actually liked the pattern on this mirror so much, I decided it would make a great display. I got in from Salvo for around $4. Make sure the frame is in good condition, if not, it's okay to use it, you'll just have to take some extra steps in the middle of this how-to. You should also choose a frame that is pretty unique and will have a pattern or dimension that you will be able to see behind a few coats of spray paint.
Here's what you will need:
a picture frame or mirror, whatever size you can handle
1 can of clear varnish
a ruler or measuring tape
wood glue
screw in hooks ( you can get it from metalliferous or a hardwear store )
elmer's wood glue
a drill and drill bit ( a dremmel or flex shaft will work too)
a set of 2lb weights or heavy books
a great pencil
an eraser
spray paint of your color choice
Newspaper, scrap paper
Safety goggles
Pliers
cut wood ( read directions first!)
1. Start with your nice, clean frame. Turn it over and remove the backing, any staples, cardboard and glass. Also, if you have any cracks in the frame, now is the time to glue the pieces with wood glue and set it aside for 24 hours before doing more.


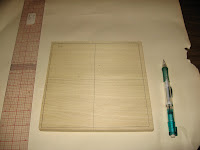
3. Next, you will want to make marks on your wood, so you can find out where you will want to put the screw in. I did a graph of quarter inches. It doesn't really matter if you can't get everything really straight, as long as it's pretty lined up, it's okay. Afer you make all your marks, check off where you would like the screws to go. You can put the jewelry you will be displaying on the wood, to make sure you have enough space in between. Then you can mark off in dark X's where you would like to drill.


Next, you 'll want to place the frame face down and apply a good amount of wood glue on the inside. Place the wood with the screws face down on the frame. It will take about 24 hours for the glue to dry completely, so place a few weights or books on the back of the frame and wood, so it can really be bonded.


That looks great! What do you use for displaying necklaces in a small space?
ReplyDeleteHi Liz! This can be used in a small space, as it's so flat. I also put frames that don't have easels built in on easels. If you use a larger frame and put it on an easel, that should solve the small-space-display problem !
ReplyDeletealicia
fantastic project...thanks for sharing! I've struggled with the display thing too. Lately, I just lie flat on a mat with earring cards. But now I'm newly inspired....
ReplyDeleteI like this. I've seen others with photo frames but they weren't solid and the view between strips often detracted from the jewelry that was displayed. You can find more display ideas at: http://hubpages.com/hub/Booth-Display-Options there are 4 hubs there on different display. Hope you enjoy!! Teri
ReplyDeletehttp://www.sandtcreations.com/wordpress