The first three steps really comprise one big operation, so I cover them together, followed by the fourth step.
Removing the Bobbin Case and Bobbin, Inserting the Bobbin into the Bobbin Case, and Inserting the Bobbin Case into the Shuttle Race
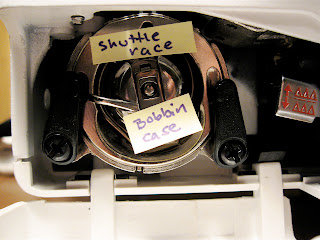
As mentioned earlier, the action in this operation occurs in the compartment below the needle plate, behind the bobbin door. It's where the bobbin lives, in a case, inside a part of the machine called the shuttle race.
The first step of the present operation is to remove the bobbin case from the shuttle race. (Before you start make sure the needle is at its highest position.) Open the bobbin door. Find the little latch on the front of the bobbin case and pull it to release the bobbin case from the shuttle race.
Next, insert the bobbin into the bobbin case, leaving a tail of thread about about 3-3.5 inches long outside it.
Pull the end of the thread through the little notch on the inside rim of the bobbin case and out an oval-ish opening on the side of the bobbin case, called the tension spring.
Holding the bobbin and bobbin case together, pull the latch on the front of the bobbin case again and set the bobbin case inside the shuttle race. A handy tip: The bobbin case and shuttle race are like pieces of a puzzle; they have corresponding, inverse parts. Specifically, the bobbin case has an arm attached to the front of it that fits into a notch at the top of the shuttle race. Line up the arm and the notch and place the bobbin case onto the center pin of the shuttle race. Release the latch. The completed puzzle looks like this:
You're done! Close the bobbin door!
Drawing Up the Bobbin Thread
(This step requires that you've already threaded the upper thread. Please see my previous post for instructions if you haven't. Thanks!)It's all starting to come together! Hold the upper thread (here, in dark blue) to the left side of the needle loosely with your left hand. Turn the hand wheel slowly toward you until the needles goes down and comes up. The bobbin thread (here, in red) will be brought up looped around the upper thread.
Pull the bobbin thread out with your fingers and together with the upper thread, under the presser foot to the rear of the machine.
Until next time --
Linda
Purty Bird


2 comments:
It's important to read and look carefully at the instruction manual, mine requires that the bobbin be placed so it pulls counter-clockwise when placed in the case. If it is wrong it gets all tangled up.
I agree, Rozy! The instruction manual is your friend! Thanks for commenting!
Post a Comment