
Showing posts sorted by date for query scraps of felt. Sort by relevance Show all posts
Showing posts sorted by date for query scraps of felt. Sort by relevance Show all posts
June 20, 2012
What to Do With Scraps of Felt, Part VIII: Make a Mobile
Today's How-To is an expansion of my What to Do With Scraps of Felt Part VII: Make a Festive Garland. It starts with strands of felt shapes weighted by jingle bells and attaches them to a simple frame to create a mobile.
May 18, 2012
What to Do With Scraps of Felt, Part VII: Make a Festive Garland
I confess: I have a thing for dangly art. I like making it, and I like looking at it. I like the variously gentle and energetic movement in the free-hanging kind, and I like the potential variability of the of the attached-to-something-but-not stationary kind.


In terms of design elements, I also like simple shapes and bold colors. These proclivities lend themselves well to the scraps-of-felt project---number seven in the series, by the by---that I present to you today. I think it's kind of fun and I hope you do too. Yay!
Materials

- Scraps of felt
- Straight pins
- Scissors
- Glue
- Four-pound fishing line
- A large jingle bell or other decorative doo-dad with a little weight to it (optional)
Steps
Cut a length of fishing line and tie a loop in one end. With a small piece of tape (fold one end over sticky sides together aid removal) secure that end to a table or the like.
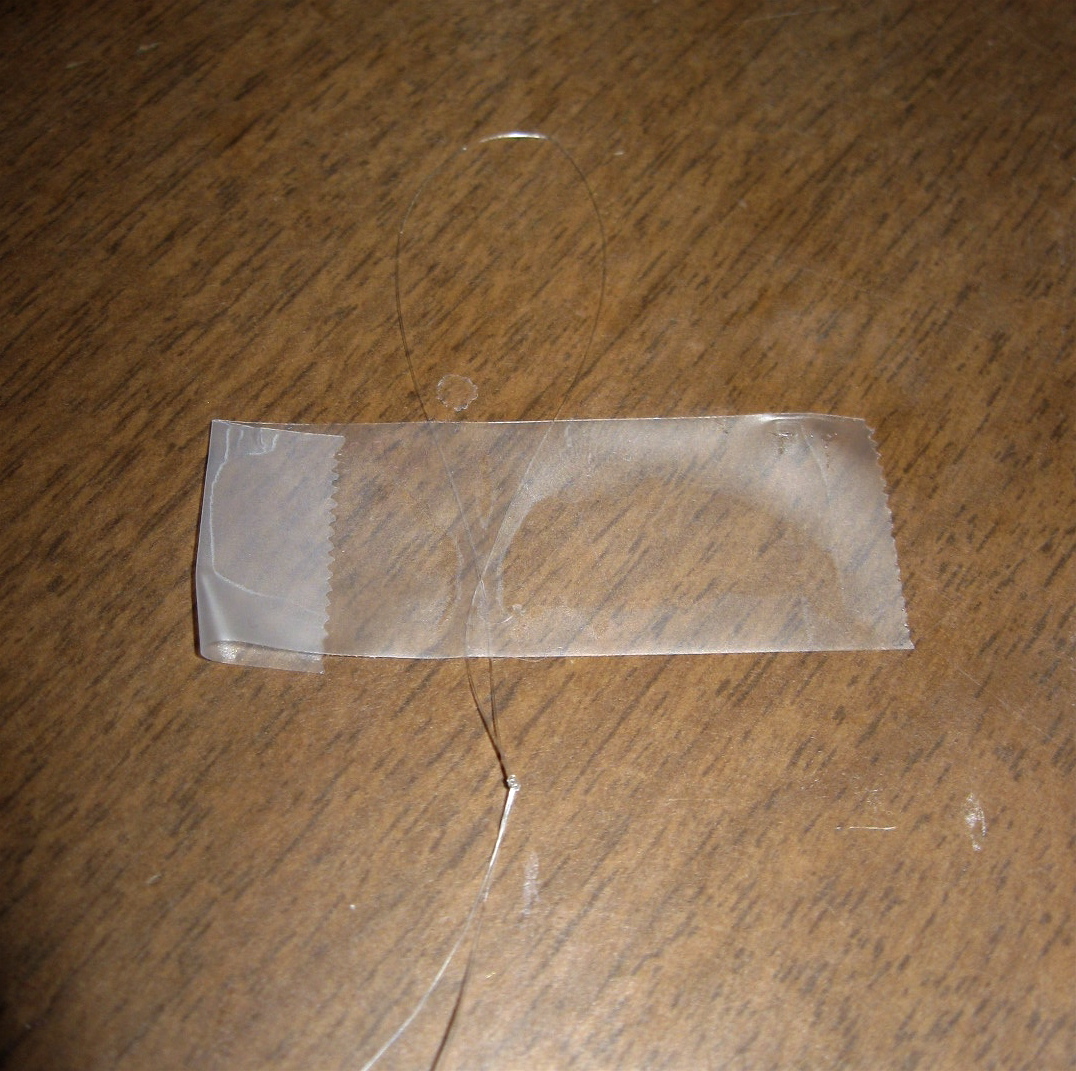

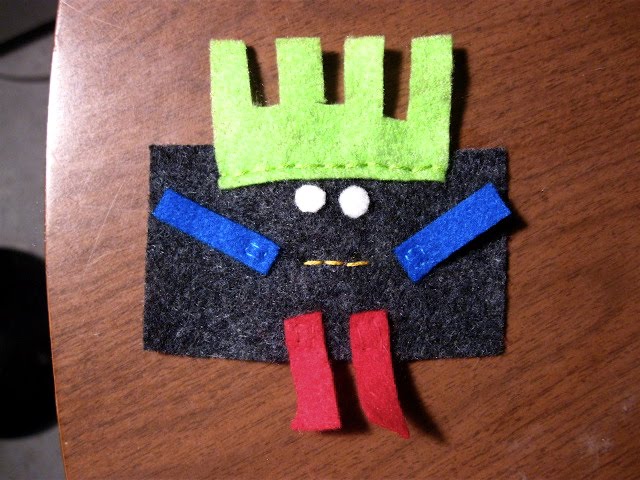
Cut shapes from scraps of felt. I like to stack shapes on top of each other for a dimensional look so I cut several different sizes of shapes.

Regardless of whether you decide to stack or not, start by cutting shapes of the same size to sandwich the fishing line between. Pin two pieces of felt together with their back (less fuzzy) sides facing each other and snip away.

Separate your pieces. Apply a line of glue to the back side of one of the shapes and align it with the fishing line. Set the line in the glue. Affix the other shape, fuzzy side up, to the first shape. Gently press together.


Glue smaller shapes to the base shapes until you're happy with the result. Do this to both sides or just on one, depending on how you intend to display the result (if against the wall, one side; if free-hanging, both sides).

Display suggestions and tips: If you're going to hang your work vertically, say, in a doorway, tie a jingle bell or similarly weighted object to the loose end to stabilize it a bit.

If you're going to hang your work horizontally, more akin to a garland, skip the jingle bell in favor of another loop.

And there you go---a festive garland for everyday or party use. Enjoy!
Until next time,
Linda
October 28, 2011
Remember Hello Etsy? This Is A Recap!
The last time we met, reader/ fellow crafter/{NewNew} lover/ lover of handmade goods, I talked about my excitement for the Hello Etsy Summit back in September (we are not going to talk about how we are three days away from November). Today, we're gonna recap that long ago event and share some tips I think you need to know to help jump start your inner eco-warrior.
September 27, 2011
On Being a Saver
As I've mentioned before, I'm a saver of things that might rightfully be considered trash and thrown away --- felt scraps, for example. But, per the felt scraps example, I save these things because of their potential to become something not-trash. I see their possibility for transformation. I know I'm not alone in this among crafty types.
September 6, 2011
What to Do with Scraps of Felt, Part VI: Make a Cuff Bracelet

This use for scraps of felt was inspired by a post I originally saw on Craftzine on how to make a felt friendship bracelet. I saw potential in the general idea presented there of a wide band of felt embellished with embroidery. One fun direction that I thought it could go, and that would help me use some of my very large quantity of felt scraps, was to embellish it not just with embroidery, but also with additional felt, possibly among other things.
Materials
- A strip of felt that is at least 3/4" wide and as long as needed to encircle the wrist of the wearer-to-be with a little gap between the ends, and a minimum 1" allowance on each end (sorry if that's confusing; illustrative pictures to follow!)
- Smaller pieces of felt
- Embroidery floss
- Thread (optional, as long as you have floss)
- Sewing/embroidery needles
- Buttons, beads, or the like (sequins?); maybe even fabric paint
- Fabric glue (optional)
Steps
Fold each end of the felt strip over at least 1" and pin in place (you'll note that I folded mine over much more; this was because I measured the length of the strip only approximately and used the fold-overs to adjust it).

Using three 18" lengths of embroidery floss, sew the sides of one end of the felt together. Pull the floss through to the middle so that you have the equal lengths of all three strands on either side.

Two down, one to go
Braid the strands on either side of the felt and finish with a knot.

Using a matching color of thread or embroidery floss, sew the sides of the other end of the felt strip together leaving enough of a loop for the braided floss on the other end to be laced through it.

Embellish the felt strip with additional pieces of felt and whatever else.

Lace the braided floss through the loop on the other end of the strip and tie together.

Done!

Until next time --
Linda/Purty Bird
July 12, 2011
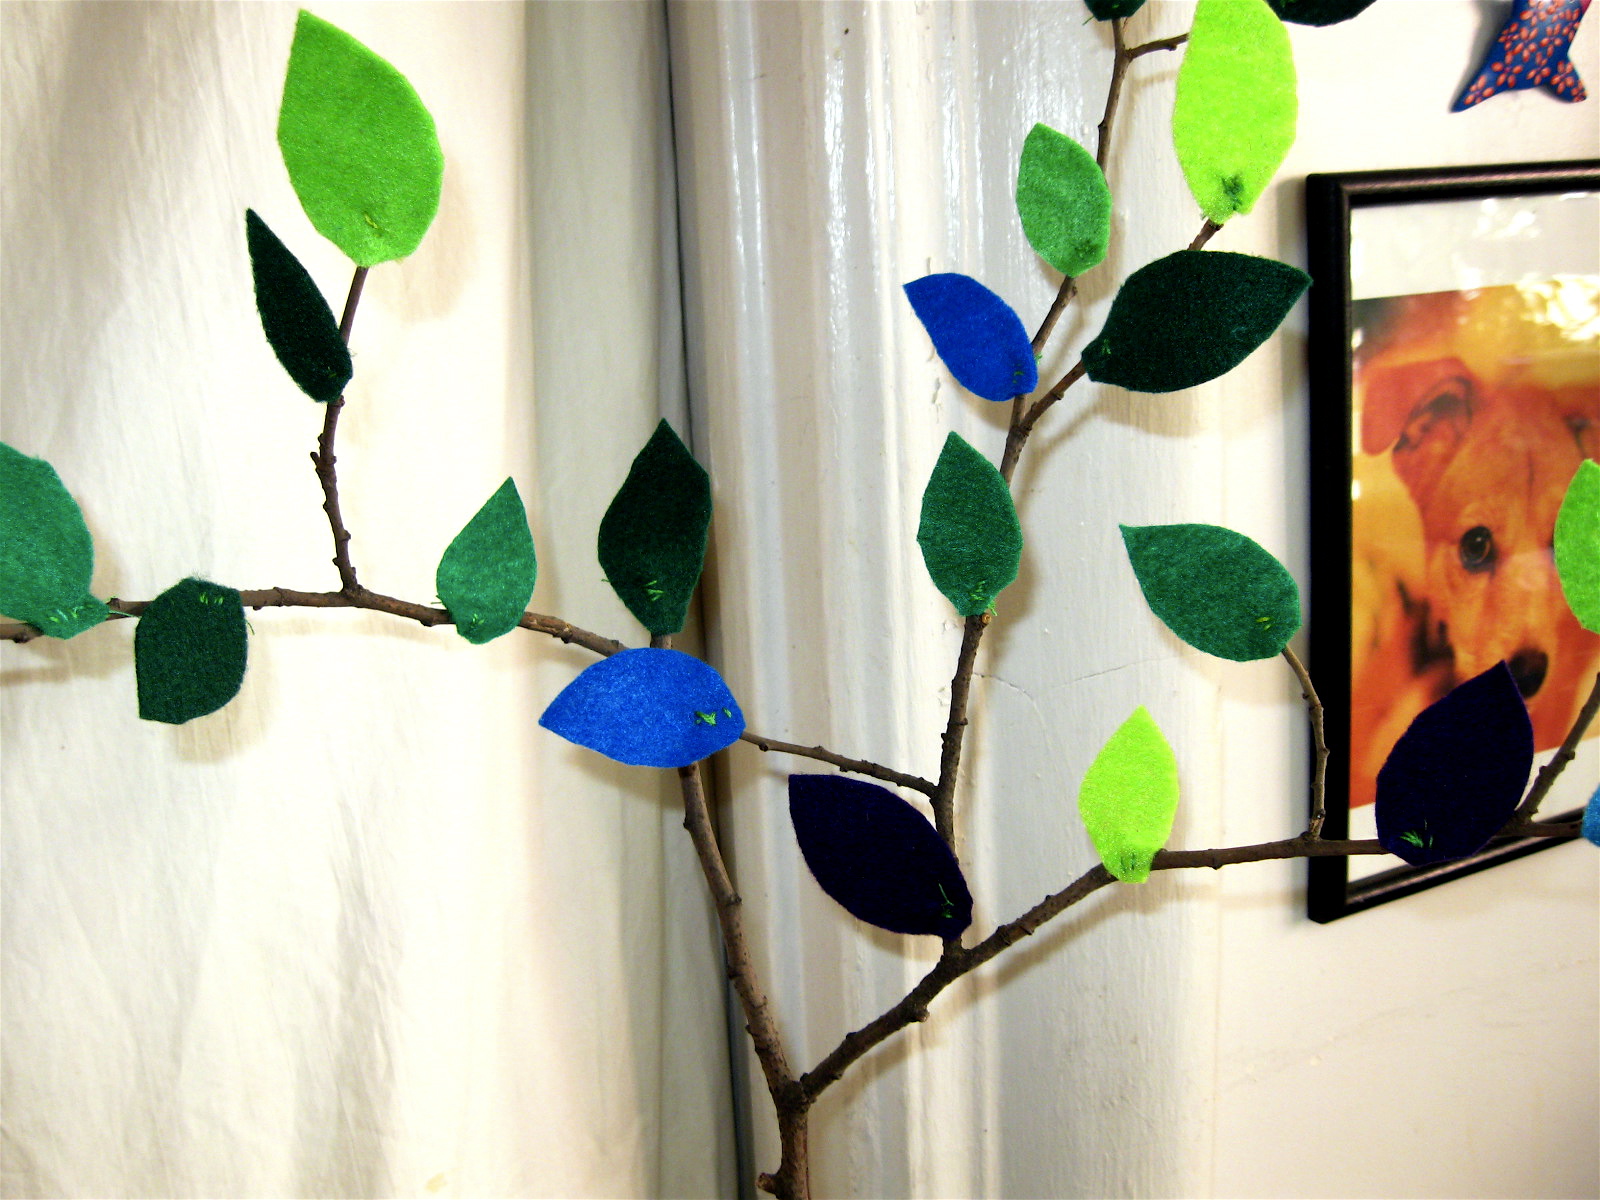
What to Do with Scraps of Felt, Part V: Make a Whimsical Tree-Branch Decoration

Here's a relatively easy little project using scraps of felt to make a cute table-top tree-branch decoration. Use it as a centerpiece or as stand-alone decorative piece (I'm thinking Martha Stewart here -- maybe you have a corner table or better, an old-fashioned tea cart standing somewhere in your home -- set your whimsical tree-branch there to enjoy continuously.)
Materials
 Small tree branch (I found mine in the park)
- Scraps of felt in different shades of green, plus a few other complementary colors if you feel like it
- Scissors
- Needle and thread or embroidery floss (possibly optional -- I'll explain)
- Glue (I used quick-drying tacky glue but you may know of something better)
- An actual vase or something that can be used as such, e.g., a wine bottle
- If you use an actual vase, something to set the branch(es) in so they don't move around, e.g., river pebbles.
Steps
- Gently brush any debris from your branch and snip off any dangling ends. Set aside.
- If you're using a vase to set your branch in, prepare it by filling it with river pebbles or the like. Set aside.
- Select your scraps of felt. Depending on the size of the branch and your taste for realism, choose pieces big enough to make leaves that "fit" the size of the branch. I personally didn't bother to do this but bravo to anyone who does!
- Cut out your leaves. I cut mine freehand but you can certainly use a template if your taste for realism is strong or you're going for a more polished finished piece.

- Set your branch in your container of choice. Attach your leaves to the branch. There are obviously a number of ways to do this. I tried glue first but my tacky glue didn't cut it. I suspect a glue gun would. Being without one, alas, I reverted to sewing. It worked fine, and wasn't as horribly laborious as it sounds. You could probably also add some nice flourishes using fancy thread or embroidery floss if you're skilled in that kind of thing (thinking Martha Stewart again here).


- If you sew, you might want to reinforce your stitching and secure the positioning of your leaves with a dab of tacky glue on the back.

- Snip off any loose threads, shape your leaves a bit and otherwise tidy-up your work as necessary. Enjoy!

Until next time --
May 19, 2011
Urban Composting

The rain showers here in NYC haven't let up in what seems weeks. If you are anything like me, your overall summertime morale hasn't benefited from all this precipitation, but the flowers, gardens and lawns sure have. My own urban garden is growing so fast, lush and green it's amazing!
Gardening is one of my favorite DIY hobbies. Such satisfaction from planting tiny little seeds, taking care of them, feeding the soil and watching everything grow! I used to think I didn't have much of a green thumb, but those days are a changin' my friends. Like anything else, the more you work at it the more you learn over time.

After covering the basics, the next logical step in my gardening journey is composting. For some reason composting had always intimidated me, I have always felt that you have to really 'know what you are doing' to get results....I sort of chuckle thinking about that now, because it's actually pretty easy. You throw stuff in a bin, mix it up once in a while and you get beautiful lush fertilizer. It just takes a little elbow grease and patience (and of course knowing your 'greens' and your 'browns')! Not only is it organic, it reduces your garbage output and it's totally free.
Urban composting can be done indoors or outdoors in various different ways, in small spaces and large. You can make it work for you, your lifestyle and your space. To fend off my composting fears (like how do I prevent a stinky bin, what about rats and flies and stuff...?) I attended a composting workshop held by the Lower East Side Ecology Center (through the NYC Compost Project). It gave me the confidence to go for it on my own and have been working mine for just over a month now!

My metal compost bin + what I added today (before it got a good stir!)
Don't have enough space, time or resources to compost yourself - but want to put your organic waste to good use?
Several of the city's Greenmarkets are running a pilot composting collection program. You can save your compost materials (like your veggie scraps, coffee grinds or eggshells) and bring them to the collection site. Did you know that over the past nine weekends they have collected almost 50,000 pounds of food scraps in Brooklyn and Manhattan? That is a ton of waste being kept out of New York City's garbage turned into useful nutrients.
Even if your urban garden is your windowsill or your fire escape it's enough space to have a DIY garden all your own. Carve out a little piece of green :)
Happy gardening!
Useful composting resources + links for NYC residents:
Now go out there and get your hands dirty!!
Until next time.....
~ Corey
April 19, 2011
What to Do with Scraps of Felt, Part IV: Make Finger Puppets!
Here's a quick and easy project using scraps of felt that you can do just about anywhere. I started the one I'm about to document while selling my wares at the Hell's Kitchen Flea Market this past weekend, for instance.
Now, before I start I just want to say that there are some really nicely-made finger puppets out there (check out this post by NewNew blogger, Karina, for a great tutorial), and these ones I made aren't them. No. Mine are, shall we say, a bit rough around the edges? But they're fun and easy and that's at least half the point.
Materials
All you need is felt pieces long and wide enough to cover your (or someone else's, say, a child's) finger, plus some smaller bits for details; embroidery floss or thread; a needle or two large enough to accommodate said embroidery floss or thread; pins to hold things together while you sew, and perhaps a bit of fabric glue and fabric paint if you don't want to sew every little detail.

The piece of felt I started with.
Steps
First, Find yourself a piece of felt as described above and wrap it around your finger. Pin the ends together where they overlap, making a tube.

Next, sew up the open side and top of your tube.
 Snip off the pointy edges if you like, and begin adding details. I started with a pair of eyes and a pair of pants. I sewed the pants to the bottom of the tube and let the legs extend beyond it. For fun I used a contrasting color of embroidery floss and continued stitching beyond the point where they attached to the felt.
First details: Eyes and pants.
 Back at home from the market, I added a hat. I did the same as with the pants and stitched all the way around the perimeter of the hat with a contrasting color of embroidery floss.
 Then I stitched my little hat-and-pants-wearing guy a mouth and glued him on a nose.
 I finished with a couple of dabs of fabric paint for eyeballs. And my first-ever, rough but cute in an ugly sort of way finger puppet was complete!
But, all the while I was making my first-ever finger puppet I was wondering if I was doing it the best way, starting with an already sewn-up tube instead of a flat piece of felt. So, being constitutionally unable to leave well-enough a lone, I made a second-ever finger puppet in this alternative way. Feeling less restricted in terms of sewing on the details, I got a bit ambitious and gave this second finger puppet arms.
Second puppet, different method, different details.
Although the sewing-on of details was certainly easier, it was harder to tell where to put them. I used the eyes to as a point of reference, remembering that the area I had to work with was small. Even so, the arms ended up way on the sides of the tube, pretty much out of view.

Where'd the arms go?
It was easy enough to reposition them, but only by so much. And I got the right arm wrong again.

Better, but still not quite right.
So even though it was easier to sew on the details using the second method, I'd go with the first method and close the open side and top of the felt first. It's easy enough to hide the ends of your thread/embroidery floss in-between where you sew the sides of the felt together.

Hiding a knot in-between the sewn-together sides of the felt tube.
In short, keep it simple and have fun!

Until next time --
Linda
March 29, 2011
What to Do with Scraps of Felt, Part III: Make a Cute Bracelet
This one is super-easy and perfect for Spring (which I trust will arrive any day now). Keep it simple and unrestrained or bump it up a notch with a few extra steps for a more sophisticated look.
Materials

- Scraps of felt cut up into squares, rectangles, triangles, circles, or what-have-you
- Elastic stringing material such as Stretch Magic or Elonga; I used 5 mm but 7 mm would also probably work, depending on the size of your felt bits
- Scissors
- Needle
- Beads (optional)
- Fabric glue (optional)
- Thread (optional)

Decide whether you want a more or less restrained final piece. If you go the less restrained route, simply thread your needle with about one-and-a-half to two-times the amount of stringing material you need to go around your wist, tie a knot in one end, and begin stringing the bits of felt onto it. When you've got enough to go around your wrist, pull the knotted end of the stringing material away from the felt so that you have enough loose material on either end to make a knot (I used a modified square knot; click on the Elonga link above for a great illustration). Wear it as-is, or trim away some of the shagginess with a scissor.


If you want a slightly more restrained (but no less festive)-looking final product, select bits of felt that are of roughly equal size and alternate their colors. Add some beads at regular intervals for even more variation. I used felted beads in the sample above but most 7-10 mm glass, stone or plastic beads would also work well. Just be sure the hole is large and smooth enough to fit your stringing material without shredding it.
Finally, if you're feeling really ambitious, or if you want an even more polished final product, you can stack your bits of felt in different color combinations and either glue or sew them together to make your own beads. String them alone or with a few accent beads in-between.


Easy-breezy Springtime fun, both to make and to wear!
Until next time -
Enjoy!
Linda
Subscribe to:
Posts (Atom)