June 30, 2008

What inspires you to be creative?


What inspires you to be creative in your artwork and/or crafts?


For me, nature is a constant source of inspiration. Many trees fascinate me, as do cloud formations.

Even though I live in Brooklyn, I am lucky enough to live on a tree-lined street and I choose to walk places where there are tree-lined streets. Also, I live very close to a large and beautiful park!

Wherever I travel I sketch and photograph trees and landscape settings.

My imagination is probably the largest source of inspiration for my artwork, since everything I draw and paint is imaginary, even though it is initially based on phenomena in nature.

Here is a drawing I created very recently, that is loosely based on bare trees I have seen in nature and in photographs:


What are your sources of inspiration for your creations???


by

Nina Kuriloff

June Team wrap up!

June's blog promotion saw a week of father's day and grad posts by WabisabiBrooklyn, KimmChi, LuxSugar and YoursTrulyxoxo, with stories of crafty dad's and crafty gifts for dad. The rest of the month, we focused on crafting on the go and travel inspired crafting from KimmChi, WaiSze, WabisabiBrooklyn, Collective Elements, Luckx4 and KartDesign. Also with a great Gocco tutorial from FadingFlowers.

The Team, Live and in Person
We continue our rotation at the Brooklyn Flea in June, with new tents and happy hearts. We have added new members into the rotation including PresenceOfColor, KMStitchery, LuxSugar, Beadscarf, HelenFitz, Kopah, KreatedbyKarina, BeaconBookmarks and FadingFlowers.

Cakehouse, Metalsugar and BetterThanJam all participated in the Renegade Craft Fair on June 14 and 15 in the Williamsburg handing out some team promos for us and selling their wares in the hot hot sun and intensely crazy rain.

KimmChi, Fubabee, Beadscarf, KMSitchery,NordeaSoaperie, Yaniamor, KarensMonsters, WaiSze, Fofolle, and wabisabiBrooklyn all participated in The Seventh Heaven Market down 7th Avenue in Park Slope where they were in a series of blocks designated "Handmade".

Team Member Press
On June 27 and 28 Meredith of Fashiontary blogged about KimmChi at the Brooklyn Flea.

On June 16, Craftzine featured MetalSugar in their wrap up of the Renegade Craft Fair.

Mayluk was featured on Shine on June 1 on in Junior Society on June 10.

On June 3, staff writer, Marilyn Perez of VenusZine picked The {NewNew} as her staff pick of the week.

The {NewNew} cares!
Team members KimmChi, Cakehouse, BShorr, ArtByIris, Fubabee, Honorata, Jantar, Loveforever, and MiraArtz all got together to create and donate a charity gift basket full of productions from their shops to the Third Annual Juice Box Auction Fundraiser.
______________
Coming up - look for the {NewNew} on the road - going out to Philadelphia to The Philadelphia Independent Craft Market and possibly planning our own event up in Beacon.

-Kimm
KimmChi.etsy.com

June 29, 2008

Handmade Postcards - let your crafts do the traveling!

Blech! It sure has been hot and sticky this June! Even with all this glorious talk of travel and crafting on-the-go, sometimes it’s nice to settle down with an icy cool glass of lemonade in front of the AC and do some travel-inspired crafting in the comfort of your own home. To that effect, let’s make some handmade postcards! We can dream up collages inspired by faraway places, and then, our handiwork can do the traveling for us. This is a great, cheap, quick project to do with friends, kids, or by yourself, and the variations are endless. Most of the stuff you’ll use is probably already in your house!

All you need to get to work is:

  • Something to cut with
  • Something to cut up
  • Something to stick stuff together


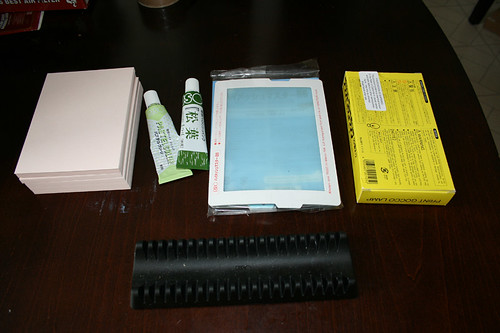
In this picture, I’ve assembled shoeboxes, scissors, magazines, clear tape, chip brushes, and every crafter’s best friend: Mod Podge! If you don’t have Mod Podge, I’d recommend running out to your local craft or art supply store to pick some up. This stuff is glue, sealant, and pretty shiny surface all in one! It makes all collage projects really sizzle, and you can even use it for jewelry projects and more. But, it’s not completely necessary to make postcards – you can use regular white Elmer’s glue, or even clear scotch tape or packing tape!

The first step is cutting out the basic postcard shape. If you have any shoeboxes lying around, they make excellent postcards. The card stock is usually the right thickness and they're typically white on one side (where you're going to put the address); plus, one shoebox is enough to make over a dozen postcards. Talk about upcycling!

The easiest way to prepare the shoebox is to remove the lid and cut down each of the four corners, from the lid to the bottom, so that you have one flat piece of cardboard.


Then, you can either trace a postcard you have, or just measure yourself. Many smaller shoeboxes already have great sizes built into the bottoms and sides.

****note! USPS guidelines dictate that your postcard must be between 3.5x5” and 4.5x6” – so if you want your postcard to be mailable without the risk of return to sender, heed these size restrictions!****


Cut out the rectangles with scissors, or an X-acto knife if you’re especially crafty. Frayed cardstock edges can be cleaned up by carefully running the sharp edge of the scissor/knife back and forth along the ends, perpendicular to the cardstock.


If you do NOT have any shoeboxes lying around, never fear! A clever alternative is to dive right into those magazines you’ve lined up for collage selections, cut out 4-5 postcard-size pieces from the front or back cover, and staple, tape, or glue them all together. If you use glue, be sure to use thin coats and wait for them to dry to avoid wrinkles.

Other places you might find usable cardstock/cardboard:

  • Back of a legal or other notepad
  • Junk mail
  • Boxes of envelopes, cleaning supplies, frozen dinners, video games, … etc!!

Now comes the fun part – collaging!! Going with our travel theme, I thought about how fun it would be to yank people out of their advertisment-paradise. Perhaps Ms. Bikini Model would like to spend some time with a mound of dirt?? Cut or rip out the pictures, get creative! If you want to cover the postcard with a background, use the cardstock to trace the right size.


If you’re using Mod Podge or Elmer’s glue, the first step is to glue down the pictures with just a SMALL amount of adhesive. Less glue = fewer wrinkles!

Tip: if there's a nice, clean white side to your shoebox, and a brown or less nice side, glue to the less nice side, and leave the nice white side for writing your message and address.

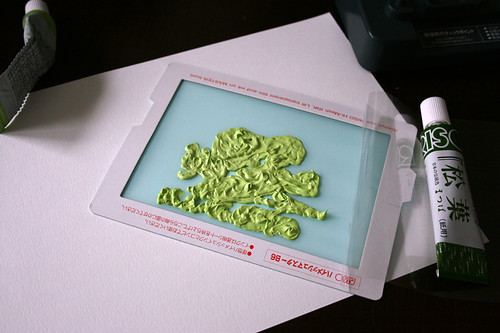
Then, if you’re using Mod Podge, the best way to apply it to the surface is with a handy chip brush. My 1” chip brush was literally 50 cents. Not a bad buy! Regular bristle brushes are totally fine, but need to be cleaned immediately to avoid permanent gunkiness. You can use your fingers if you’re low on time, money, or the motivation to go to the craft store (hey, it is really hot out there!!), just be sure to clean up your fingers! Oh, and please don’t let kids put glue/Mod Podge on their hands.… Pour a little Mod Podge out into a small bowl or jar, and spread it thinly and evenly over your pictures. You may want to start in the middle and work your way out to try to keep the edges as flat as possible. But wrinkles are bound to happen with cheap magazine paper! Embrace the wrinkle.


You can use normal Elmer’s glue here, but you have to mix the glue with equal parts water beforehand. This works VERY well with tissue paper, because it absorbs the watery glue. It’s not quite as good with magazine paper, especially since it sometimes stays a little cloudy even after it dries. But it will keep those edges down and provide a slightly more even surface. You can always just glue underneath and leave the edges to the mercy of the post office!

Packing tape can be a really fun way of attaching pics too! It gives it a nice industrial effect – good with maps, newspaper, and other less glossy materials. Instant shine! Be aware - there will be some tape overlapping to the white side. Work with it :)


The very final step is making sure you have a surface to write on! After all, postcards are all about communicating. If you used a plain white shoebox, you’re good to go! Felt tip pens write most easily, but you could always use ballpoint pens, markers, pencils….

If you used magazines or any cardstock that isn’t white, you can just paste in a plain sheet of printer paper, notepad paper, or any other salvaged paper that’s free of extraneous typing remnants. A secret source of glossy white paper can be found in magazine ads – just look for VW, Apple, or other such classy products! There’s much white space to be found if you do a little flipping.

If you’re fantastically crafty, you may even have gold and silver fabric pens. They write on anything, even multicolored magazine ads.


And now you’re done! You can collage all kinds of things onto your postcard … ticket stubs, photos, tissue paper, even little bits of fabric. Send some memories to a friend – just be sure to add 27 cents for postage!!

The {NewNew} Team Events

••••••••••••••WHERE TO FIND US IN NY••••••••••••••
Nov 13 - Teams Around the World Trunk Show in The Etsy Virtual Labs. 7PM SHARP!
Nov 16 - {NewNew} Day at the Brooklyn Indie Market from 11 to 7
Dec 6 - Holiday Handmade Cavalcade, at the Knitting Factory 10am to 5pm - 74 Leonard Street

Each SATURDAY two of our members, Fofolle and WabisabiBrooklyn bring you the Brooklyn Indie Market at Smith and Union Street, Carroll Gardens. The Indie Market is open from 11am to 7pm.

Each SUNDAY our members can be seen rotating participation at our space at the Brownstoner Brooklyn Flea at Lafayette between Clermont and Vanderbilt. A/C to Lafayette Ave, G to Clinton/Washington Ave. The Flea is open from 10am to 5pm.

June 27, 2008

Gocco how to Tutorial:

History of what Gocco is:

Gocco is a device that was invented in the 1970's, is a system that develops quick and easy printing. It is somewhat similar to a rubber stamp pad. If you wish to read more about it please click on the following link: what is gocco?

Using a gocco isn’t that hard, it’s really simple as long you are prepare and that you have all your supplies with you. Although there are few times I made some errors – it’s all about experimenting and accepting the errors you made.


Supplies – Gocco models - pg –5 or pg-11 – these two are the most popular models, although I really like the pg-11 cause the pad table is movable where you want to align your work.

I’ll be using my pg-11 for my gocco tutorial. In this tutorial I’ll be working on wedding related project I recently accepted. I’m working on Save the Date cards.

First I gather all my supplies:

  • Bulb
  • Master screen prints
  • Inks
  • Blue filter
  • Papers
  • Pencil
  • PG-11 machine & PG-11 Lamp Housing

Using a pencil comes in handy cause I like to align all my work before I start the actual printing.

The Design:

When designing from the computer make sure your dpi resolution set to a high resolution. For instance the image that I set is on 100 dpi resolution and text part is 600 dpi. You want to avoid printing your work pixilated. I always like to get clear and smooth prints.

Then I printed out my design on a laser jet printer on a black and white format. Make sure print out has a lot of carbon ink so this way your artwork will transfer onto the master screen print with out any problems. Or another way you can use a carbon pen and draw on your work.

Next I set my print out work onto the gocco pad plate.

Tips: Be sure to use a cardboard to set on top of the sticky pad. Do not expose the print out straight onto the sticky pad, Your carbon print out might not capture your work on to the master screen print cause the sticky pad is too strong that the paper will stick on the pad from keeping it from being expose once you lift up the gocco device.

I had once incident that I did not put the cardboard on top of the sticky pad and the design that I expose was stuck on the sticky pad keeping it from getting exposed to my master screen print.

Once I align and set where I want to expose my screen – don’t forget the blue filter and also the lamp housing.

The filter is to help you from prevent the carbon print out getting it stuck to the master screen print.

Here's are the final results of two of my master screen print being exposed:

At this stage I’m inking up my screen and printing it out and tada here’s the final touch.

And here's the final touch print out:

In this project I split up two screens because the area within the gocco device isn’t enough space for me to capture everything within one screen print out. The most I can capture is 6x4, so be sure to plan out ahead and figure how much space you need before printing and working on your design.

Hope you enjoy the little mini gocco tutorial, it’s a fun little project for all different occasion. Just remember practice makes perfect.

Where to Find The {NewNew} on June 28 + 29

Saturday is the Brooklyn Indie Market at Smith and Union Street, Carroll Gardens, Brooklyn, with stylish skirts by Fofolle.

Off of Fort Greene Park, you can find CityBitz at the Artisanal Market.

On Sunday, in Fort Greene, Brooklyn Flea continues, reachable by bus and subway. This week's {NewNew} members will be AdornmentsNYC, CityBitz, KreatedbyKarina, Fubabee, KarensMonsters and WaiSze.

Also this Sunday the Brooklyn Indie Market will host a day of Craftin' Kids workshop where our very own BeaconBookmarks will be decorating bookmarks with the kids.

-Kimm
KimmChi.etsy.com

June 26, 2008

You Put a Hex On Me!


Here in New York, my daily commute is nearly an hour on the subway. Until I find a way to convince my employer to move out to Brooklyn (unlikely!), I will be in search of crafts to occupy my time on the train. Quilting doesn’t usually come to mind when one thinks of crafting on-the-go, but with just a little at-home prep work, English paper piecing is one way that you can take it with you...at least for the piecing part.

Back in January I decided that I wanted to make a Grandmother’s garden quilt, which will take almost 2,000 individual pieces. Ouch. I expect to be done sometime around 2015. If you’re not into that level of time commitment, you could always sew up a few flowers and then applique them onto other blocks, or make cute little flower coasters. I think that they would also make adorable elbow patches for a sweater or jacket. Once you have the technique down, you could also move on to other small interlocking shapes.

These little hexagons are quite the rage in the online craft world right now. You can see some nice examples here, here, and here.

• Piece of fabric—at least 4” x 6” for the flower petals
• Small scrap of fabric for the center
• Freezer paper
• iron
• Scissors
• Needle and thread
• Nail clippers or small thread cutter

First you need a template. I created mine in Illustrator and I occasionally sit down to trace little hexagons onto freezer paper and cut out a bunch at a time. You might think I’ve got too much time on my hands, but really I’m just cheap—there are also companies that sell pre-cut paper templates if you’re not quite as masochistic as me. You will need 7 hexagons for each flower; 6 petals and one flower center. Cut your templates out of the freezer paper and place them shiny-side down onto the wrong side of your larger piece of fabric. They should be at least 1/2” apart to allow for a 1/4” seam. Set your iron to the cotton setting and iron over the 6 petal pieces to fuse them to the fabric. Repeat with the 7th piece on the smaller fabric scrap. Cut each hexagon from your fabric, leaving a 1/4” border all the way around the paper template. Some people just cut a square around the hexagon, but that leaves too much bulk in the seams for my taste.
From here on out your project is portable! Stash it in your bag and it’s ready to go with you on the train, in the car—even on the plane! Next, thread your needle and knot one end of the thread. Hold the hexagon with the paper/wrong side facing you. Fold the seam allowance down over the paper template. Use the needle and thread to make long basting stitches through the 2 layers of fabric and the template. (Do your neighbors a favor and pull the needle straight down or else straight back toward yourself—no one likes the feeling of a needle coming at them!)
When you come to the corner fold the next side over the template and continue all the way around the hexagon. You want to strike a balance between speed (you will be pulling these stitches out later) and accuracy (you want to keep the shape fairly true so that the blocks will fit together later). Take 2 short stitches to hold the thread when all of the edges have been turned under. Cut the thread (I carry nail clippers and a little thread cutter with me on the train) and continue turning the edges of all seven pieces. Now take two petal pieces and place them right sides together, aligning the edges. Using your needle and thread, whip stitch one edge together. Finish with a few tight stitches on top of each other. Cut your thread and repeat with the remaining 4 petals. You will now have 3 sets of two petals. It’s the flower center’s time to shine! Open one of the flower petals sets. Take the flower center piece and match it, right sides together, to one of the flower petals. Whip stitch one edge together, starting from the outside and stitching towards the second petal. (I’m right-handed, so I start on the right side and stitch left). When you come to the end of that side, open the flower center seam and fold it back down, repositioning it so that you can stitch the second edge to the second petal (you will have to fold the first petal in half to do so).
Continue this all around with the other 2 petal sets.

You should now have the 3 double-petal sections attached to the center. The final step is to whip stitch the petal sections together—just 3 more seams! After you've sewn all of the petals together, carefully pick out the basting thread from the center. Gently pull the freezer paper template out from the center piece. You may have to tug a little if it is caught in your whip-stitches. It’s up to you what you do next. If—like me—you’re now hooked, you start another flower set and just keep going, trying not to think too much about how many flowers lie ahead of you. Otherwise, applique the flower to another piece of fabric (again removing basting threads and paper templates carefully as you go and move on. I have fallen in love with this technique because it allows me to have a (very) long term project that includes lots of short-term immediate satisfaction as I complete each flower. I love seeing the little flower pile grow. It is also a very compact little project that can be tucked into my purse and pulled out for those inevitable train delays, traffic jams, and long layovers.
Then I'm marching ever-so-slowly towards my goal—even if I'm sitting still!

June 25, 2008

Sidewalk Chalk Art


One of the bonuses of being a parent is that I get to re-experience some of the joys of childhood. I know many of us can remember playing hopscotch in front of our apartment buildings or houses. The setup was almost as important as the actual game. If you weren't lucky enough to have an actual stick of chalk, you'd look for that perfect rock or piece of concrete for drawing your beautiful hopscotch grid. A clean flat stretch of sidewalk would do but it was better when you could draw on that sweet black pavement of the street or a driveway.

As the only girl in my generation in my family, it wasn't often I could get my brother or cousins to play hopscotch with me. It was more likely I would play skully or one of a million games of freeze tag, hide 'n' seek, or hot peas and butter with them. So I spent most of my moments with that hopscotch piece of chalk drawing masterpieces on black pavement. It was WAY better than drawing on my small chalkboard at home. Outside, my pictures could stretch forever and be admired by anyone who happened to walk by.

Now I share that with my little artist daughter every summer. We take our bucket of sidewalk chalk and draw hearts and flowers in front of our house. Sometimes my nephews (even the 12 year old one) will join us as we do our part to beautify the world.

More art in the city:
Evaporation T-shirt by Ikyoto


City-Bowery by Art by Iris


Decorative Swirl Tee by Kimmchi

P.S. You can learn more about sidewalk games at Streetplay.com.

Danielle
Collective Elements