Showing posts with label project. Show all posts
August 8, 2012
Pretty Planters
I come from a family of green thumbs. My dad was famous for his vegetable garden (corn, tomato, beans, etc.)and my mom was always in the garden (despite her allergies.) We always had many different plants growing all over the house.
I questioned my ability with plants when I first tried to grow some in my old apartment. I blame it on the lack of sunshine (basement apartment.) My current apartment has sunshine all day, and my plants are thriving! I am always on the lookout for some nice planters. The plant pictured below has been sitting in a chinese food plastic container for at least a year. I finally decided to replant it before it died on me.
I got some paint, a terra cotta planter, glue, and some pebbles left over from my fish tank, and got to work. I decided on yellow paint, and applied two coats. I did not paint all of the inside...just enough for the paint to show if the dirt did not completely come to the top of the planter.
After the paint dried, I carefully glued the pebbles to the outside of the planter. You can pretty much glue anything...I almost decorated the planter with some plastic sea shells I found in Michaels. I decided that they might look better on a blue planter, so I will save them for the next time.
I transferred the plant to the new pot, and all was fine until I woke up this morning. For some reason, the pebbles were starting to come off, and the glue that had dried clear last night, looked white as if I just applied it. I used an all-purpose glue, and that might be my mistake. I think that the water in the plant may be seeping through the terra cotta. So, if you are going to try this, research different types of glue so that you don't make the same mistake I made. Now, I have to figure out how to fix this and hopefully save my little plant. If anyone has any suggestions, please let me know!
-Nordea
nordeasoaperie
Labels:
DIY,
garden,
nordea soaperie,
plant,
planter,
project,
terra cotta
July 18, 2012
Quick & Crafty Tuesday w/Sam
My very good friend, Kristyn is planning to move across the country at the end of the year. We have been friends for 15+ years, and I was crushed when she told me the news in March. I knew this day was coming, but secretly hoped the day would never come.
Anyway, as a last hurrah, she signed up to run the NYC marathon in November. A few weeks ago, she sent out a note asking for help watching her daughter while she trained after work.
I was excited for the opportunity for a little "crafty time" with her 5-year-old daughter Sam. So, I went to one of my favorite stores, Michaels for some fun ideas.
I settled on some blank picture frames that we could decorate. I purchased some puffy stickers, metallic flowers, tiny pom-poms, colorful ribbon, glue, and of course glitter! I also printed out a picture that I had taken of Sam when I met them for dinner a few weeks back.
I arrived at their apartment with my bag of crafty goodness. Kristyn had her sneakers on, and off she went, promising us she would be back in about an hour. Sam & I got to work because her frame was going to be a surprise for her mother once she returned home.
I laid out all of the goods, and Sam and I carefully selected our decorations...cutting ribbon, repositioning pom-poms, gluing flowers until we were satisfied with our picture frames. We were saving the glitter (oooh, glitter!!) for last.
We just about finished with the glitter, when Kristyn came back home. "Oh mom...don't look yet!" We still had to put the picture in the frame! So, we quickly put in the photo, and Sam presented the finished project to her mom.
After a lot of "oohs and ahhs" I said my goodbyes and came home. I probably looked a little crazy on the bus, covered in glitter, but satisfied that I was able to spend some quality time with Sam. She seemed to like the ribbon a lot (little pink owls,) so next time we may try to decorate some headbands or hair clips with ribbon (I just have to figure out how!)
Just a quick idea for a fun Tuesday evening of your own...Happy Crafting!
-Nordea
nordeasoaperie
Anyway, as a last hurrah, she signed up to run the NYC marathon in November. A few weeks ago, she sent out a note asking for help watching her daughter while she trained after work.
I was excited for the opportunity for a little "crafty time" with her 5-year-old daughter Sam. So, I went to one of my favorite stores, Michaels for some fun ideas.
I settled on some blank picture frames that we could decorate. I purchased some puffy stickers, metallic flowers, tiny pom-poms, colorful ribbon, glue, and of course glitter! I also printed out a picture that I had taken of Sam when I met them for dinner a few weeks back.
I arrived at their apartment with my bag of crafty goodness. Kristyn had her sneakers on, and off she went, promising us she would be back in about an hour. Sam & I got to work because her frame was going to be a surprise for her mother once she returned home.
I laid out all of the goods, and Sam and I carefully selected our decorations...cutting ribbon, repositioning pom-poms, gluing flowers until we were satisfied with our picture frames. We were saving the glitter (oooh, glitter!!) for last.
We just about finished with the glitter, when Kristyn came back home. "Oh mom...don't look yet!" We still had to put the picture in the frame! So, we quickly put in the photo, and Sam presented the finished project to her mom.
After a lot of "oohs and ahhs" I said my goodbyes and came home. I probably looked a little crazy on the bus, covered in glitter, but satisfied that I was able to spend some quality time with Sam. She seemed to like the ribbon a lot (little pink owls,) so next time we may try to decorate some headbands or hair clips with ribbon (I just have to figure out how!)
Just a quick idea for a fun Tuesday evening of your own...Happy Crafting!
-Nordea
nordeasoaperie
September 16, 2008
recycled bath mat
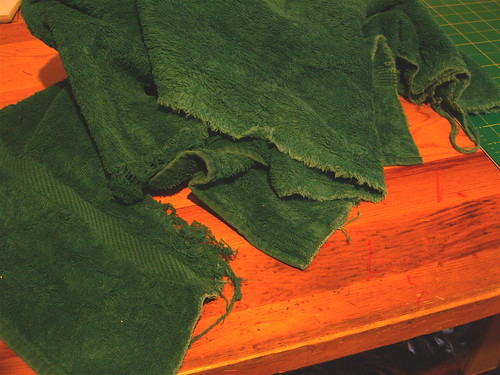
recently the towel that my husband has been using since college (!) sustained some injuries that made it unusable:unusable as a towel, that is. as the base for a new bath mat, it was perfect. and so i embarked on a project to dress up our bathroom.
materials:
- an old towel
- a yard or so of fabric that you'd like to place your just-out-of-the-shower feet on [i used the ruffle from an old bedspread]
- pins
- needle and thread, or sewing machine
method:
1) cut your towel into two equal-sized rectangles, at whatever size will fit best in your bathroom.
2) iron your fabric, and cut it into strips that are 4-1/2" wide, and 4" longer than the sides of your rectangle in length (so, unless you've cut squares out of your towel, you'll have 2 strips of one length and 2 strips of another).
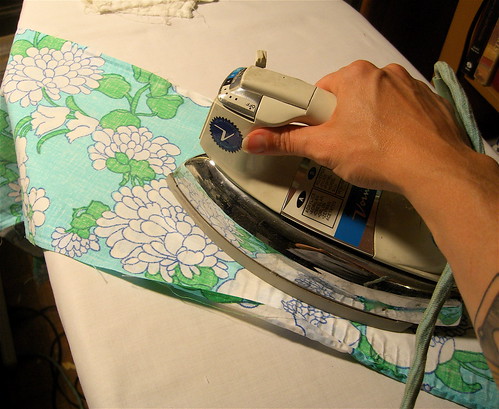
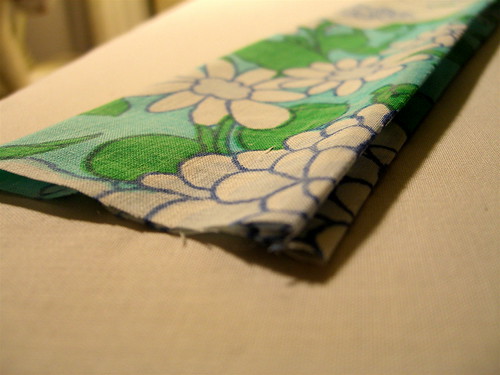
3) iron down a 1/4" fold on each of the long sides of the strips, then fold in half and iron the whole strip flat, until it looks like this:
then fold back 2" at the short ends of each strip, and iron down.
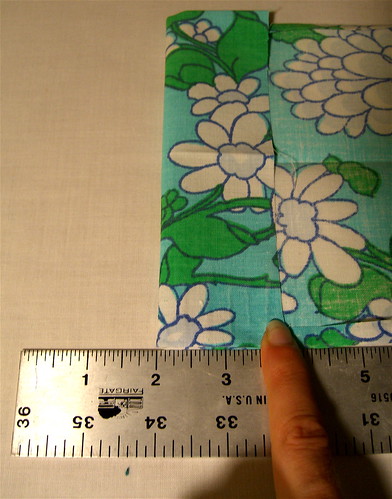
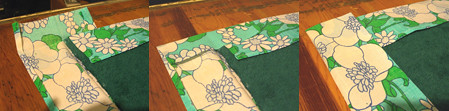
4) place the two rectangles of towel on top of each other, lined up neatly. then place the strips of fabric under the edges of the towels and fold them over at the crease that you ironed in, so that they create a border. follow the photos below to make neat corners:
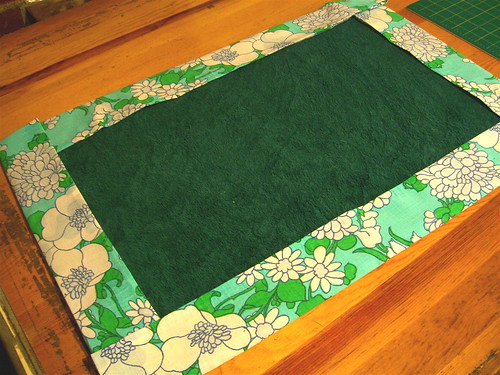
5) if you like the way it looks at this point, just sew a straight stitch along the inside edges of the border, being sure that you catch both the front and back edges, and you're all done!
6) however if, like me, you're not crazy about the color of your towel, or just want more of the fabric in the design, or just want to make life more difficult for yourself, you can keep going. i decided to fill in the middle with a lattice design, like the back of an old lawn chair. if you are going to go this route, don't sew that broder fabric down just yet....
start by cutting a bunch of strips of fabric in a width that looks appealing to you (i used 2"). remember to add a 1/2" to that width for finishing the edges. measure the open space of your mat that you need to fill, and figure out how many strips you need to cut to fill it. for length, cut them an inch longer than the open space, to allow for them to overlap (or, acutally, underlap) with the border fabric.
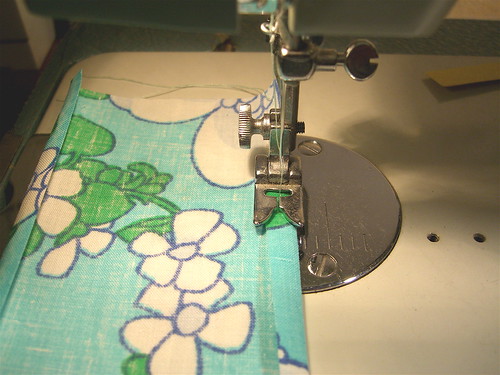
iron down a 1/4" on each of the long sides of the strips, then sew them down with a straight or zig-zag stitch.
**if you are working with a fabric that's prone to fraying, add 1" to the width that you decide on for the strips, and fold the edges of the fabric over on themselves again before sewing down.
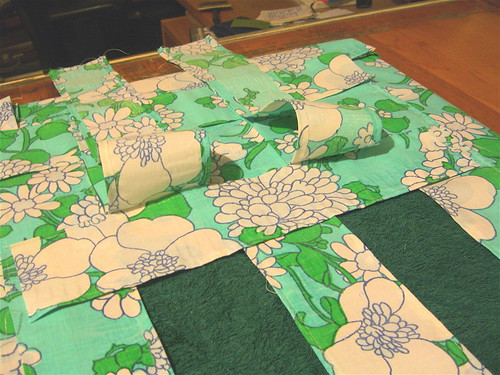
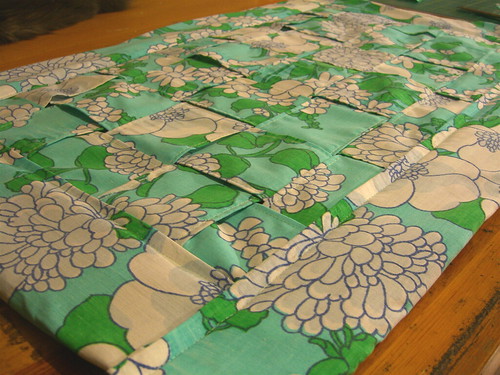
7) weave the strips together...
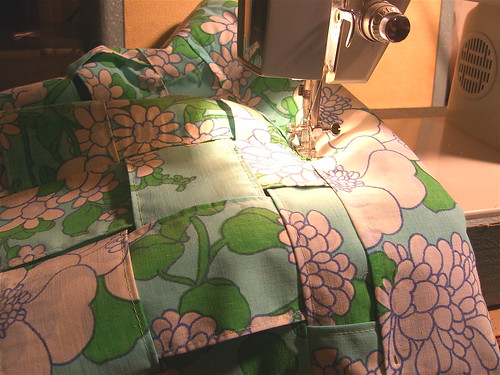
...pin them around the edges, and baste them to the towels.
8) then put the border fabric back in place, fold it over the lattice, and pin it down. sew a straight stitch along the inside edges of the trim, being sure that you go through both the front and back edges.
and that's all!
- cakehouseJune 29, 2008
Handmade Postcards - let your crafts do the traveling!
Blech! It sure has been hot and sticky this June! Even with all this glorious talk of travel and crafting on-the-go, sometimes it’s nice to settle down with an icy cool glass of lemonade in front of the AC and do some travel-inspired crafting in the comfort of your own home. To that effect, let’s make some handmade postcards! We can dream up collages inspired by faraway places, and then, our handiwork can do the traveling for us. This is a great, cheap, quick project to do with friends, kids, or by yourself, and the variations are endless. Most of the stuff you’ll use is probably already in your house!
All you need to get to work is:

In this picture, I’ve assembled shoeboxes, scissors, magazines, clear tape, chip brushes, and every crafter’s best friend: Mod Podge! If you don’t have Mod Podge, I’d recommend running out to your local craft or art supply store to pick some up. This stuff is glue, sealant, and pretty shiny surface all in one! It makes all collage projects really sizzle, and you can even use it for jewelry projects and more. But, it’s not completely necessary to make postcards – you can use regular white Elmer’s glue, or even clear scotch tape or packing tape!
The first step is cutting out the basic postcard shape. If you have any shoeboxes lying around, they make excellent postcards. The card stock is usually the right thickness and they're typically white on one side (where you're going to put the address); plus, one shoebox is enough to make over a dozen postcards. Talk about upcycling!
The easiest way to prepare the shoebox is to remove the lid and cut down each of the four corners, from the lid to the bottom, so that you have one flat piece of cardboard.

Then, you can either trace a postcard you have, or just measure yourself. Many smaller shoeboxes already have great sizes built into the bottoms and sides.
****note! USPS guidelines dictate that your postcard must be between 3.5x5” and 4.5x6” – so if you want your postcard to be mailable without the risk of return to sender, heed these size restrictions!****

Cut out the rectangles with scissors, or an X-acto knife if you’re especially crafty. Frayed cardstock edges can be cleaned up by carefully running the sharp edge of the scissor/knife back and forth along the ends, perpendicular to the cardstock.

If you do NOT have any shoeboxes lying around, never fear! A clever alternative is to dive right into those magazines you’ve lined up for collage selections, cut out 4-5 postcard-size pieces from the front or back cover, and staple, tape, or glue them all together. If you use glue, be sure to use thin coats and wait for them to dry to avoid wrinkles.
Other places you might find usable cardstock/cardboard:
Now comes the fun part – collaging!! Going with our travel theme, I thought about how fun it would be to yank people out of their advertisment-paradise. Perhaps Ms. Bikini Model would like to spend some time with a mound of dirt?? Cut or rip out the pictures, get creative! If you want to cover the postcard with a background, use the cardstock to trace the right size.

If you’re using Mod Podge or Elmer’s glue, the first step is to glue down the pictures with just a SMALL amount of adhesive. Less glue = fewer wrinkles!
Tip: if there's a nice, clean white side to your shoebox, and a brown or less nice side, glue to the less nice side, and leave the nice white side for writing your message and address.
Then, if you’re using Mod Podge, the best way to apply it to the surface is with a handy chip brush. My 1” chip brush was literally 50 cents. Not a bad buy! Regular bristle brushes are totally fine, but need to be cleaned immediately to avoid permanent gunkiness. You can use your fingers if you’re low on time, money, or the motivation to go to the craft store (hey, it is really hot out there!!), just be sure to clean up your fingers! Oh, and please don’t let kids put glue/Mod Podge on their hands.… Pour a little Mod Podge out into a small bowl or jar, and spread it thinly and evenly over your pictures. You may want to start in the middle and work your way out to try to keep the edges as flat as possible. But wrinkles are bound to happen with cheap magazine paper! Embrace the wrinkle.

You can use normal Elmer’s glue here, but you have to mix the glue with equal parts water beforehand. This works VERY well with tissue paper, because it absorbs the watery glue. It’s not quite as good with magazine paper, especially since it sometimes stays a little cloudy even after it dries. But it will keep those edges down and provide a slightly more even surface. You can always just glue underneath and leave the edges to the mercy of the post office!
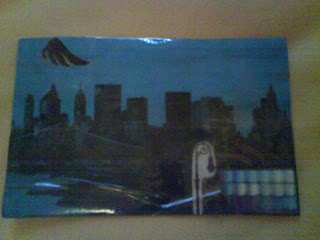
Packing tape can be a really fun way of attaching pics too! It gives it a nice industrial effect – good with maps, newspaper, and other less glossy materials. Instant shine! Be aware - there will be some tape overlapping to the white side. Work with it :)

The very final step is making sure you have a surface to write on! After all, postcards are all about communicating. If you used a plain white shoebox, you’re good to go! Felt tip pens write most easily, but you could always use ballpoint pens, markers, pencils….
If you used magazines or any cardstock that isn’t white, you can just paste in a plain sheet of printer paper, notepad paper, or any other salvaged paper that’s free of extraneous typing remnants. A secret source of glossy white paper can be found in magazine ads – just look for VW, Apple, or other such classy products! There’s much white space to be found if you do a little flipping.
If you’re fantastically crafty, you may even have gold and silver fabric pens. They write on anything, even multicolored magazine ads.

And now you’re done! You can collage all kinds of things onto your postcard … ticket stubs, photos, tissue paper, even little bits of fabric. Send some memories to a friend – just be sure to add 27 cents for postage!!
All you need to get to work is:
- Something to cut with
- Something to cut up
- Something to stick stuff together
In this picture, I’ve assembled shoeboxes, scissors, magazines, clear tape, chip brushes, and every crafter’s best friend: Mod Podge! If you don’t have Mod Podge, I’d recommend running out to your local craft or art supply store to pick some up. This stuff is glue, sealant, and pretty shiny surface all in one! It makes all collage projects really sizzle, and you can even use it for jewelry projects and more. But, it’s not completely necessary to make postcards – you can use regular white Elmer’s glue, or even clear scotch tape or packing tape!
The first step is cutting out the basic postcard shape. If you have any shoeboxes lying around, they make excellent postcards. The card stock is usually the right thickness and they're typically white on one side (where you're going to put the address); plus, one shoebox is enough to make over a dozen postcards. Talk about upcycling!
The easiest way to prepare the shoebox is to remove the lid and cut down each of the four corners, from the lid to the bottom, so that you have one flat piece of cardboard.
Then, you can either trace a postcard you have, or just measure yourself. Many smaller shoeboxes already have great sizes built into the bottoms and sides.
****note! USPS guidelines dictate that your postcard must be between 3.5x5” and 4.5x6” – so if you want your postcard to be mailable without the risk of return to sender, heed these size restrictions!****
Cut out the rectangles with scissors, or an X-acto knife if you’re especially crafty. Frayed cardstock edges can be cleaned up by carefully running the sharp edge of the scissor/knife back and forth along the ends, perpendicular to the cardstock.
If you do NOT have any shoeboxes lying around, never fear! A clever alternative is to dive right into those magazines you’ve lined up for collage selections, cut out 4-5 postcard-size pieces from the front or back cover, and staple, tape, or glue them all together. If you use glue, be sure to use thin coats and wait for them to dry to avoid wrinkles.
Other places you might find usable cardstock/cardboard:
- Back of a legal or other notepad
- Junk mail
- Boxes of envelopes, cleaning supplies, frozen dinners, video games, … etc!!
Now comes the fun part – collaging!! Going with our travel theme, I thought about how fun it would be to yank people out of their advertisment-paradise. Perhaps Ms. Bikini Model would like to spend some time with a mound of dirt?? Cut or rip out the pictures, get creative! If you want to cover the postcard with a background, use the cardstock to trace the right size.
If you’re using Mod Podge or Elmer’s glue, the first step is to glue down the pictures with just a SMALL amount of adhesive. Less glue = fewer wrinkles!
Tip: if there's a nice, clean white side to your shoebox, and a brown or less nice side, glue to the less nice side, and leave the nice white side for writing your message and address.
Then, if you’re using Mod Podge, the best way to apply it to the surface is with a handy chip brush. My 1” chip brush was literally 50 cents. Not a bad buy! Regular bristle brushes are totally fine, but need to be cleaned immediately to avoid permanent gunkiness. You can use your fingers if you’re low on time, money, or the motivation to go to the craft store (hey, it is really hot out there!!), just be sure to clean up your fingers! Oh, and please don’t let kids put glue/Mod Podge on their hands.… Pour a little Mod Podge out into a small bowl or jar, and spread it thinly and evenly over your pictures. You may want to start in the middle and work your way out to try to keep the edges as flat as possible. But wrinkles are bound to happen with cheap magazine paper! Embrace the wrinkle.
You can use normal Elmer’s glue here, but you have to mix the glue with equal parts water beforehand. This works VERY well with tissue paper, because it absorbs the watery glue. It’s not quite as good with magazine paper, especially since it sometimes stays a little cloudy even after it dries. But it will keep those edges down and provide a slightly more even surface. You can always just glue underneath and leave the edges to the mercy of the post office!
Packing tape can be a really fun way of attaching pics too! It gives it a nice industrial effect – good with maps, newspaper, and other less glossy materials. Instant shine! Be aware - there will be some tape overlapping to the white side. Work with it :)
The very final step is making sure you have a surface to write on! After all, postcards are all about communicating. If you used a plain white shoebox, you’re good to go! Felt tip pens write most easily, but you could always use ballpoint pens, markers, pencils….
If you used magazines or any cardstock that isn’t white, you can just paste in a plain sheet of printer paper, notepad paper, or any other salvaged paper that’s free of extraneous typing remnants. A secret source of glossy white paper can be found in magazine ads – just look for VW, Apple, or other such classy products! There’s much white space to be found if you do a little flipping.
If you’re fantastically crafty, you may even have gold and silver fabric pens. They write on anything, even multicolored magazine ads.
And now you’re done! You can collage all kinds of things onto your postcard … ticket stubs, photos, tissue paper, even little bits of fabric. Send some memories to a friend – just be sure to add 27 cents for postage!!
Subscribe to:
Posts (Atom)