Happy day-after-Earth Day!
Two weeks ago, I had promised photos and a recap of the Etsy craft event on making terrariums, but I didn't make it. I had to rush home to dog walk. Yep. I was dog sitting that week and had to make sure the rascal was okay.
Needless to say, I missed the event, but heard many, many great things about it. I've even seen a few of the terrariums made that evening and am full of envy that I don't have my own to share with you.

Showing posts with label Earth Day. Show all posts
Showing posts with label Earth Day. Show all posts
April 23, 2012
April 5, 2012
April Is Earth Month! Let's Celebrate!

I have to be honest with you though, there is many a day where I sit in front of this space and scratch my head not knowing what to write. I know, I should an editorial calendar, but I've been slacking (and I admit it) and therefore don't. For me, the basics are simple- feature helpful environmental, crafty, artisanal, and accessible tips, projects, artists, products for those looking to make an impact whether large or small in their own art, craft and/or business world. At least that is my mission; I hope you find it agreeable and that you've been inspired thus far.
April 22, 2011
What does Earth Day mean to you?
...It comes only once a year, is celebrated by millions of people around the globe and creates environmental awareness.
You guessed it - today is Earth Day! ...and what makes this year even more special? - it's Earth Day's 40th anniversary!!


You guessed it - today is Earth Day! ...and what makes this year even more special? - it's Earth Day's 40th anniversary!!
I think of Earth Day as a time to celebrate, a time to reflect and a time to take action - to be a part of the solution.
What does Earth Day mean to you? Does it strike a chord with your inner do-good self? Maybe you already know the ropes and are a whiz at recycling...or maybe you are a casual recycler and want to get more involved? Small acts of change add up...everyone can do something to help!!
{NewNew} member Groundsel uses up-cycled suits
to make her gorgeous earth-friendly bag

New York City and the 5 boroughs are home to hundreds of events, workshops and fairs for Earth Day fun.
Want to get involved? One of the best places to start is the official Earth Day website where you can find all sorts of fun things to do, from parties in Times Square to street festivals at Grand Central Station. Brooklyn is even throwing a few block parties and events at the local farmers markets.

So then why not make it a whole week of celebrations? On Saturday April 30th, McCarren Park in Brooklyn is hosting the Go Green! Greenpoint Earth Day festival and market...featuring many talented members of The {NewNew}! (...go ahead, click on the link to find out more!)
So whether you will be out in the crowd celebrating in style, even if you're not one to march with the masses in Times Square...do a little good today, show your Earth Day spirit....
...make today count, make a pledge to do one more new thing this year and do the right thing for our environment...you know you want to let your inner do-good shine :)
make the earth happy today, and every day....

...because we all {heart} New York :)
by {NewNew} member virginiakraljevic
Thanks!!
April 16, 2009
How-To: Turn Bags into Beads
 I've become somewhat of a curator of plastic bags. In fact, there are some doors you shouldn't open in my house because you will be buried under an avalanche of interesting plastic. Primarily, I fuse these bags into collages and turn them into other things like: BEADS.
If you would like to transform your own collection of plastic bags into beads, follow these instructions:
Materials
- Clean plastic bag
- Parchment paper
- Iron
- E6000 or similar glue
- Toothpicks
- Scissors
- Ruler
Place two layers of plastic between two sheets of parchment on a hard surface and iron them together using a low setting with the steam set to off.
 That will leave you with a sheet that looks like this:
Making the Bead
Cut out a triangular shape that is about 4 inches long and 1/2 inch wide at the bottom. You can play around with the sizing. The wider the triangle, the longer the bead and the longer the triangle, the fatter the bead.
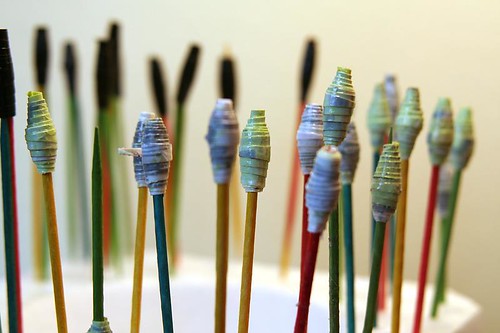
 With a toothpick, apply a thin layer of E6000 or similar glue to one side of your triangle. Leave a small strip free of glue at the base of the triangle. Place a clean toothpick at the base and roll up the triangle around the toothpick so it shapes an oval bead. Jiggle the toothpick a little to make sure that it doesn't stick to the bead.
 Leave the toothpick in the bead and stick it into something to dry overnight. I used a dried out bit of Model Magic clay, but any kind of Styrofoam, etc. will work as well.
 Once your bead is dry you can lacquer it or leave it as is and use it in a project like this:
or this:
 Happy Recycling!
groundsel.etsy.com
April 29, 2008
Reusing old materials in traditional crafts
This past week I had the opportunity to travel to Brasstown, North Carolina to take a class at the John Campbell Folk School. In honor of Earth Day, the Folk School led a week of classes focused on earth-friendly crafts. Some classes foraged around the school campus for discarded items to use in their projects, and other classes took old objects and made them new again. On the final evening of the week-long school, each class presented what they made; the beauty of these crafts has inspired me to look around my home for old items to transform. Take a look at some of the work created during the week.....
 Before my week at the Folk School, I'd never given kaleidoscopes much thought, but the kaleidoscope-making class wound up being one of the more talked-about classes of the week. Using an imaginative array of recyclables such as pill containers, water bottles, and kid toys, the class made kaleidoscopes that were fun to look at and fascinating to look through.
 Kim Joris led a mixed-media art class in which students were asked to bring in some of their old unused art works. The end result were a collection of new pieces made using students' old paintings as well as scraps from a variety of materials otherwise intended for the recycle bin.
'The Art of Re-use' was the class which proudly spoke of scavenging through trash. The art they created was inventive and dimensional with an aged patina:


Lauren Kingsland and Kim Jalette taught a class focused on making quilts that incorporate old t-shirts, creating beautiful new pieces as well as a type of functional scrapbook. The students in this class were extremely committed to their projects, working beyond the usual six hours a day, often staying in the sewing studio until late hours of the night.


 Before my week at the Folk School, I'd never given kaleidoscopes much thought, but the kaleidoscope-making class wound up being one of the more talked-about classes of the week. Using an imaginative array of recyclables such as pill containers, water bottles, and kid toys, the class made kaleidoscopes that were fun to look at and fascinating to look through.Kim Joris led a mixed-media art class in which students were asked to bring in some of their old unused art works. The end result were a collection of new pieces made using students' old paintings as well as scraps from a variety of materials otherwise intended for the recycle bin.
'The Art of Re-use' was the class which proudly spoke of scavenging through trash. The art they created was inventive and dimensional with an aged patina:


My class focused on making wood jewelry. We used scraps of wood discarded by other craftspeople, such as hardwood scraps from woodturning and furniture-making. Here are some of the pieces I created:


The John Campbell Folk School operates year-round with weekend and week-long classes in traditional crafts, music, cooking, and dance, with a particular focus on arts from the surrounding Appalachian area. Work-study and scholarship opportunities are available.
--Joanne------
April 28, 2008
how-to: re-using paper
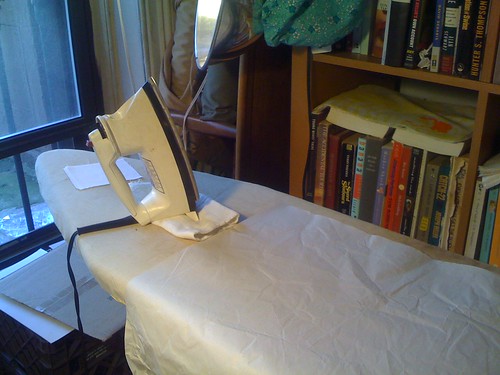
i love finding ways to recycle paper that are more interesting than putting it in the recycling bin. i use newspaper to wrap presents and clean my windows and mirrors, print documents on the back of old flyers, line my ironing board with scrap paper when i iron on fusible interfacing to keep the sticky interfacing from gooping up my ironing board cover....
one kind of paper that always seemed to me to be begging for a good recycling is packing paper. you know, the thin-ish paper that you would use to wrap up your breakables when you move, or that comes as padding in a package. it's such nice paper, but always so crinkled post-use. i wondered if it could be ironed (without setting fire to my ironing board) and brought back to useability... so when i saw an offer on freecycle for a few boxes full of used packing paper, i jumped at it.
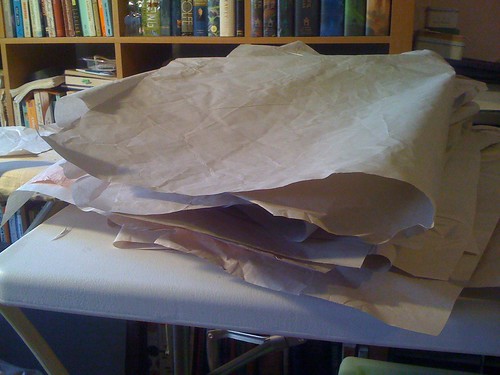
i set my iron to medium-low and gave it a shot, and it worked great!
the wrinkles weren't completely gone, but it was flat enough to work with, and really i like the way the wrinkles remain and give it texture.
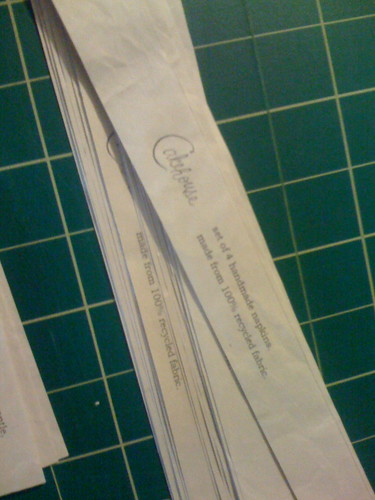
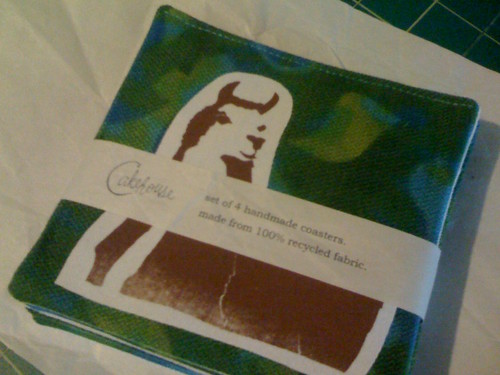
i had an inspiration for its first use, now that it was relatively flat: as wrap tags for my napkins and coasters, which would bundle them together neatly, show off my logo, and identify them all in one fell swoop.
so the next question was: could i run it through my printer? i started by cutting it into printer-appropriate size on my paper cutter.
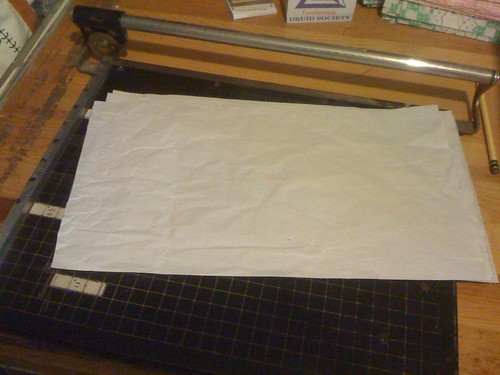
then crossed my fingers and ran it through. and...success! here it is after another trip through the paper cutter:
i'll admit, i did have one paper jam out of ten printings. but that's a ratio i can live with. and look how cute my products look in their new outfits:
i can think of tons of other uses for ironed used packing paper—flyers, small banners, wrapping paper (in fact, i already wrapped some presents in it this weekend....)—and i'm sure all you crafty people can think of lots more...share 'em in the comments section, please!
 - cakehouse
one kind of paper that always seemed to me to be begging for a good recycling is packing paper. you know, the thin-ish paper that you would use to wrap up your breakables when you move, or that comes as padding in a package. it's such nice paper, but always so crinkled post-use. i wondered if it could be ironed (without setting fire to my ironing board) and brought back to useability... so when i saw an offer on freecycle for a few boxes full of used packing paper, i jumped at it.
i set my iron to medium-low and gave it a shot, and it worked great!
the wrinkles weren't completely gone, but it was flat enough to work with, and really i like the way the wrinkles remain and give it texture.
i had an inspiration for its first use, now that it was relatively flat: as wrap tags for my napkins and coasters, which would bundle them together neatly, show off my logo, and identify them all in one fell swoop.
so the next question was: could i run it through my printer? i started by cutting it into printer-appropriate size on my paper cutter.
then crossed my fingers and ran it through. and...success! here it is after another trip through the paper cutter:
i'll admit, i did have one paper jam out of ten printings. but that's a ratio i can live with. and look how cute my products look in their new outfits:
i can think of tons of other uses for ironed used packing paper—flyers, small banners, wrapping paper (in fact, i already wrapped some presents in it this weekend....)—and i'm sure all you crafty people can think of lots more...share 'em in the comments section, please!
 - cakehouse
April 20, 2008
DIY Green Cleaning Products


One of my earliest memories is of walking along a sandy winding road in Sicily with my paternal grandmother when I was three years old. She had a glass bottle in her hand that had just been emptied of the last of its olive oil. We stopped at her outdoor laundry room - a tub complete with cold running water - and she filled the bottle about half way. What she did next blew my little three year old mind - she bent down, gathered a handful of pebbly sand, which she dropped down the bottle's slender neck. Holding her palm over the opening, she then proceeded to vigorously shake the bottle for several seconds, finally dumping the entire contents back onto the ground, refilling the bottle with water for a final rinse-and-spill to clear out any remaining grains of sand.
And voilá: the bottle was spotless!
Somehow, though our grandparents kept clean and tidy homes without employing cleaning products that have nightmarish lists of health warnings, most of us are only now realizing that you can find much of what you need to clean your home in the pantry.
Here are a few simple recipes, along with some go-to multi-taskers to help you clean your abode without harsh chemicals. I think nonna would have approved!
Multi-Tasker 1: Club Soda
- Poured into a spray bottle, club soda holds its own against much harsher and pricier all purpose cleaners.
- Since it is alkaline, it's especially adept at getting out acid-based stains, like coffee.
- Also a great window cleaner.
- On its own in a spray bottle, a killer disinfectant.
- Mix two teaspoons in a quart of warm water to use as a window cleaner.
- Used dry, it's a great appliance cleaner; wipe it off with a damp sponge.
- Sprinkled in an oven and spritzed with water, it makes a good (if slow-working: it needs to sit overnight) oven cleaner. After it sits, wash it out with water.
Drain Cleaner
1/2 cup salt
boiling water
Pour salt down the drain, followed by boiling water. Run hot tap water until clog clears.
_______________________________________________________________
Toilet Bowl Cleaner
white vinegar
baking soda
Sprinkle bowl with baking soda and spray with vinegar. Scrub with a toilet brush
_______________________________________________________________
Air Freshener
2 cups hot water
2 tablespoons baking soda
Mix baking soda and hot water in spray bottle until baking soda dissolves. Spray those nasty odors away!
_______________________________________________________________
Copper and Brass Cleaner (I use this one to shine pennies before decoupaging them and making earrings)
vinegar
salt
Dissolve 1 part salt to two parts vinegar. Soak till shiny. To use as a scrub, increase salt to make a paste and scrub your little heart out!
_______________________________________________________________
Laundry Detergent
one part washing soda
one part borax
Mix and use as you would regular laundry detergent.
(Note: both washing soda and borax are available at soaps gone by)
-MaryAnne, wabisabibrooklyn.etsy.com
April 19, 2008
EarthDay Celebration In McCarren park


Hey, i just got back from the Earthday Celebration in McCarren park. It was great, live music, earth friendly vendors and it looked like some of the local school had their science fair projects on display to try and educate.
I finally got a chance to meet Charlie of CharlieAndSarah and Amanda of MamaRobot who are both on our {NewNew} York Street Team.
KimmChi.etsy.com
April 13, 2008
Earth Day Celebrations around Brooklyn
 Ah Earthday.... there are so many great celebrations going on around the city where you can learn more about the environment and what you can do. The accompanying photo is an Art Photograph by Ania of Honorata.
If you're in the Greenpoint/ Williamsburg / Bushwick area, head on over to McCarren Park for North Brookyn's first ever Earth Day Celebration, Go Green! Go Greenpoint! on Saturday April 19 from 11 to 4pm. They'll have educational programs, recycling stations, contests, live music, and a market full of eco-friendly products, where our own CharlieAndSarah will be selling their fun line of English inspired gear for adults and children.
If you're in The Park Slope, Red Hook, Fort Greene section of Brooklyn, head on over to the Old Stone House on May 17th for the Park Slope Parents Association Eco Fest at the Old Stone House on 5th Avenue btw 3rd and 4th Streets. Kathy aka Fofolle will be there running a Monster Making workshop with some material donated by fellow {NewNew} members. There will also be 10 Green Designers vending at the event.
Know of any more in your neighborhood?
KimmChi.etsy.com
April 10, 2008
From Aluminum Cans to Jewelry
Every day at lunch, my friend drinks an Arizona Green Tea. And every day, I look at the cherry blossoms on the side of the can and think about how awesome they would look incorporated into a cute pendant or pair of earrings.
So I took home a couple of the cans, and with some other stuff I had laying around the house, turned them into this:


So I took home a couple of the cans, and with some other stuff I had laying around the house, turned them into this:

What you'll need:
-any soda/juice/iced tea can. There are so many different drinks with pretty cool designs on them.
-a Sharpie (or any other permanent marker)
-eyelets
-eyelet setter
-a disc or stamping, any shape you like
-hole punch
-jumprings
-earwires or chain, depending on what you'd like to make
-an x-acto blade (or plain old scissors if you're a reckless crafter like me)
Use the X-acto blade to cut off the top of the can, then use the scissors down the sides of the can to cut out the parts you want to use. Be careful, the edges of the cans are pretty sharp! I usually cut the can into more manageble square shapes.
Next, use the marker to trace the shape onto the piece of can. I find that it's easier to trace from the front, to make sure I get the exact part of the design I want. In this case, I traced a circle to mimic the shape of the disc:
Take the cut out shape and arrange it on top of the disc/stamping. I taped mine down to prevent it from sliding around. Use the hole punch to make holes wherever you would like to set the eyelets. I made one at the top and bottom, but you can go crazy if you want!
Set the eyelets in the holes, add a jump ring and chain, and voila! You could also make earrings, keychains, or a bracelet!
April 8, 2008
HOW TO: Paper flowers
 In the spirit of DIY and recycling I bring you a big ole pile of postcards (!) Remnants of the last Brooklyn Homeshow advertising that I could not just throw in the recycle bin. I mean - come on - postcards are expensive to print and the paper stock is just great for all sorts of things, right??
Things like what?!
And that got me thinking of all sorts of great projects to make. This project will use these postcards, some acrylic paint, a scissor and some ribbon to make paper flowers.
 To begin a quick template on paper of a simple four petal flower shape, then used this shape to cut out many many flower from this nice heavy postcard stock.
Then I painted them red on one side and black on the other. This took several coats as the acrylic paint on the postcards was a bit streaky, so I did one coat in one direction and the next coat in a perpendicular direction to try and reduce one way streaking. I
 think you can see a little bit of it in that photo. After the paint was dry, you can take an awl to cut holes in the centers of the flowers, I used my handy leather punch.
And now we are all set for assembly! I thought they would make a nice special accent to my packaging. But you can make them into pins, string them together to make a lei, no limits! Here is a picture of the final product used as a nice special way to package my tee shirts.

-Kimm
KimmChi.etsy.com
April 5, 2008
Freecycle

Freecycle is a community of global groups sorted by location that helps people looking to re-use items either by giving them or receiving them. To quote from their website: "It's all about reuse and keeping good stuff out of landfills." To sign up is totally free and you get emails daily with posts of people looking for specific items like boxes, and people looking to get rid of items like say, a coach. You can look through their regional groups and sign up for your local chapter to start receiving posts immediately!
It's also a great source for us crafty people looking for bolts of fabric, old sewing machines, sergers, flex shafts - post your wish list, you never know what someone will be trying to freecycle!
KimmChi.etsy.com
April 2, 2008
HOW TO: Make Paper from Junk Mail
Like everyone, I get a TON of junk mail. And despite my calls to company's telling them I want off their catalog mailing lists, I still get a lot of mail that goes straight into the recycling bin - incentive checks from credit cards, sale fliers, you know you get them too. Well in celebration of Earth Day, here's a great way to re-use a lot of that un-wanted mail to make new paper!
 What you'll need:
-Bucket/container
-old magazines, letters, junk mail
(no newspaper, the consistency will be just terrible, try to keep it to letters and
things printed on white paper for the best results)
-blender or food processor
-screen, deckle and mold, or i've even done it with a silkscreen, though the weight of the paper on a silk screen over time will warp it, and you won't be able to use to that way again
-iron (maybe?)
-bathtub or large container, large enough for your screen and some space to get the water to mix around
Just take your stack of paper and either shred it or rip it up into small pieces - the smaller the better really as this will be the base for your pulp and you'll be able to pull thinner sheets with finer pulp.
After it's all shredded up into small 1" pieces, set it in a bucket of water and let soak overnight to break down the paper a bit. Drain the excess water, and now it''s time for the blender! Blend the rough cut pulp with water about 1 part pulp to 4 parts water. At this time you can add in any food coloring (or hey, try natural dyes, boil some onion skins and add that to your pulp, you'll get a nice muted color and keeping in the actual skins will create some nice contrast in the final paper)
 Put all this great pulp into a large vat, big enough for you to dredge your screen through - I couldn't ever find a container big enough for my screen, so everything goes into a nice clean bath tub with the drain closed. And I add more water to the pulp. Now once that is all set, take your screen and let it sink to the bottom, and swirl around the pulp in the water so it is even. Line up the deckle on top, and while the pulp is still swirling around lift up the screen, allowing all the water to pass through the screen, leaving a nice film of pulp on the top - the deckle helps keep the sheet forming evenly. You can experiment with different thickness of paper, depending on how diluted you made the pulp.
Now this is the tricky part, getting that sheet off the screen! You can use some absorbant felt (and CHEAP too!) and stack that with some newsprint to help soak up some of the water and in one quick motion put the screen - paper sheet down - directly on to the felt. Stack another sheet of felt and newspaper and felt again, pull another sheet and stack that on top as well. As the stack get bigger, you can try squeezing more water out by laying heay books on top or putting the sheets in between two boards and a clamp, and really squeeze that water out.
 Drying time for the sheets really depends on how much water you got squeezed out initially and how moist the air is etc. Once the sheet are completely dry, if they curl up a little, you can always put them under a towel and iron them a bit to straighten them out. HAVE FUN!
I use it as gift wrap mostly because it tends to bleed when written on or drawn on. To protect against this you need to size it so that any ink on it doesn't bleed out. Have fun adding stuff and creating your very own custom paper!
I'll be offering this recycled paper in my supply shop at KimmSupplies.Etsy.com as an Earth Day / Spring special
HEY MiraArtz.etsy.com - let me know what I missed in this do-it-at-home tutorial you did this for a living!
 -Kimm
-Kimm
KimmChi.etsy.com
 What you'll need:
-Bucket/container
-old magazines, letters, junk mail
(no newspaper, the consistency will be just terrible, try to keep it to letters and
things printed on white paper for the best results)
-blender or food processor
-screen, deckle and mold, or i've even done it with a silkscreen, though the weight of the paper on a silk screen over time will warp it, and you won't be able to use to that way again
-iron (maybe?)
-bathtub or large container, large enough for your screen and some space to get the water to mix around
Just take your stack of paper and either shred it or rip it up into small pieces - the smaller the better really as this will be the base for your pulp and you'll be able to pull thinner sheets with finer pulp.
After it's all shredded up into small 1" pieces, set it in a bucket of water and let soak overnight to break down the paper a bit. Drain the excess water, and now it''s time for the blender! Blend the rough cut pulp with water about 1 part pulp to 4 parts water. At this time you can add in any food coloring (or hey, try natural dyes, boil some onion skins and add that to your pulp, you'll get a nice muted color and keeping in the actual skins will create some nice contrast in the final paper)
 Put all this great pulp into a large vat, big enough for you to dredge your screen through - I couldn't ever find a container big enough for my screen, so everything goes into a nice clean bath tub with the drain closed. And I add more water to the pulp. Now once that is all set, take your screen and let it sink to the bottom, and swirl around the pulp in the water so it is even. Line up the deckle on top, and while the pulp is still swirling around lift up the screen, allowing all the water to pass through the screen, leaving a nice film of pulp on the top - the deckle helps keep the sheet forming evenly. You can experiment with different thickness of paper, depending on how diluted you made the pulp.
Now this is the tricky part, getting that sheet off the screen! You can use some absorbant felt (and CHEAP too!) and stack that with some newsprint to help soak up some of the water and in one quick motion put the screen - paper sheet down - directly on to the felt. Stack another sheet of felt and newspaper and felt again, pull another sheet and stack that on top as well. As the stack get bigger, you can try squeezing more water out by laying heay books on top or putting the sheets in between two boards and a clamp, and really squeeze that water out.
 Drying time for the sheets really depends on how much water you got squeezed out initially and how moist the air is etc. Once the sheet are completely dry, if they curl up a little, you can always put them under a towel and iron them a bit to straighten them out. HAVE FUN!
I use it as gift wrap mostly because it tends to bleed when written on or drawn on. To protect against this you need to size it so that any ink on it doesn't bleed out. Have fun adding stuff and creating your very own custom paper!
I'll be offering this recycled paper in my supply shop at KimmSupplies.Etsy.com as an Earth Day / Spring special
HEY MiraArtz.etsy.com - let me know what I missed in this do-it-at-home tutorial you did this for a living!
KimmChi.etsy.com
Subscribe to:
Comments (Atom)