Showing posts with label display. Show all posts

April 24, 2013

Thinking outside the box...

Ahhh, Spring is here! That means the "crafty" season has begun! I have always loved strolling through a craft fair marveling at the wonderful things created by true artisans. Now that I am one of those "crafty" folks, most weekends I am somewhere out selling my wares. But, I have a hard time staying behind my booth. I am still interested in checking out other vendors' creations.

One thing that draws me to a table are the displays. I particularly love when artists choose unconventional objects. Interesting displays are always an eye-catcher, and I took a few pictures while I was at a craft fair last weekend.


Kam, who owns Kamspots had an interesting display for her ceramic hanging planters. First of all, her planters could have been displayed on a paper plate, and still gotten a second look (they are absolutely beautiful!) I was intrigued by the display, and she told me that it was a towel rack...yes like the rack in your bathroom...That's what I call creative!


Angela Colombo, designer and creator of EnchantraGirl injected a bit of nature into her display. Turning a bit of driftwood into something to showcase her delicate bracelets, was a smart move. It is a nice change from the black velvet busts that so often adorn a jewelers craft table.


Lisa LeClaire of Lisa LeClaire Designs highlighted her jewelry with some colorful shot glasses. They were the perfect fit for her eye-catching, sparkly jewelry. Her entire table was shining, and it was hard not to take a second look!


And finally, a little creativeness from Nordea Soaperie (yes, that would be me!) I had a hard time figuring out how to display my lavender sachets. I embroider each design by hand, and didn't want to throw them in a box. I found this display meant for cupcakes! It was perfect because each design can be seen, so customers can check out all of the designs without sifting through a box!

Remember that the annual Spring Handmade Cavalcade is coming up in a couple of weeks (May 4th.) I would bet that there will be a lot of creative displays to be seen. Of course it goes without saying that those displays will be showcasing some wonderul crafts too! Hope to see you there!

Until next time....happy crafting!
Nordea
nordeasoaperie

October 29, 2012

Don't Touch That: Fears-of-a-First-Time-Vendor Part One

The 1st Annual Beat-The-Crowds Handmade Holiday Happening being put on by Two Fair Ladies is coming up on November 17th and I’m a bit nervous. It is also the 1st Annual Selling-My-Work Papercut Vending Freak-Out being put on by MeThis event will signify my entry into real life, face to face, yes-you-can-touch-that selling and the more I attempt to prepare the more I realize I am seriously unprepared. It’s hard to know where to start, but I figure a good place would be getting over the idea that people will be touching my work. Quite frankly, I’m a little overprotective of my pieces and all you guys seem sticky.

What a great sign from My Zoetrope
On a more realistic level, an obstacle that definitely needs to be addressed before the show is the table display. Customers are going to be coming right up to your table (or not), touching things (or not) and buying things (or not) all based on how you present your work. If you don’t do it right then you're not going to sell anything, which is sort of an important part of selling things…the selling part.
The display is essentially You on a table and figuring out how to convey this, while making your products shoppable is the thing that has me ignoring Hurricane Sandy while I sift through page after page of photos in the Show Me Your Booth groupon Flickr.
My starting off point is pretty simple. Determine which ones catch my eye and separate out the weakest parts (much like watching lions hunt in the wild…or dating in high school) Once I’ve figured out which aspects work for me I can keep an eye out for those qualities.
Eye-catching, quirky props from (from left to right) Lisa Orgler Design, Madeline Norris' shop Meeni  and Jaime Shively's shop Crinoline
Wandering Laur adds corkboard for a beachy feel
Lauren Rogoff from WanderingLaur shared her approach, “I've been working bit by bit on my displays, and hopefully they're improving!  I sell mostly seaglass jewelry (…), so I try to keep my display looking beachy and not overly cluttered.”

I’ve got a long way to go still and all I know for sure is that I really love the things I make. After a few conversations with veteran vendors about they’re initial forays into the craft fairs it seems that overcoming your own misgivings about whether your work is good enough is actually a pretty important first step…but it will have to wait. Hurricane Sandy is coming and I have to buy this awesome spinning display before it knocks out the power. Until next time!

Jessica Alpern
Shop http://www.etsy.com/shop/JessicaAlpern
Blog  http://jessicaalpern.com
Fun   http://www.facebook.com/JessicaAlpernCutsPaper

October 9, 2008

How to Make a Great Jewelry Display for Selling

Okay, I have had about half a dozen jewelry displays in my short lifetime and none of them really impressed me or made my jewelry stand out. I even had the opportunity to have nice designer busts and whatnot, which I then spray painted black, thus ruining them. I also don't like felted displays because I have a very large cat, so hair gets everywhere, even in closed spaces.

I really looked high and low for something affordable, portable and pretty to display my jewelry when I am selling and decided to just make my own jewelry displays! I make more earrings than anything, so I was focused on something that could display my earrings in one or two places and not make my table look too junky.

I came up with picture frames! They are in every thrift store, and with my simple instructions, they can make really nice displays for your jewelry. Also, if you really like a frame to something and it's not a picture frame, say a mirror, the instructions are the same.


I actually liked the pattern on this mirror so much, I decided it would make a great display. I got in from Salvo for around $4. Make sure the frame is in good condition, if not, it's okay to use it, you'll just have to take some extra steps in the middle of this how-to. You should also choose a frame that is pretty unique and will have a pattern or dimension that you will be able to see behind a few coats of spray paint.


Here's what you will need:

a picture frame or mirror, whatever size you can handle
1 can of clear varnish
a ruler or measuring tape
wood glue
screw in hooks ( you can get it from metalliferous or a hardwear store )
elmer's wood glue
a drill and drill bit ( a dremmel or flex shaft will work too)
a set of 2lb weights or heavy books
a great pencil
an eraser
spray paint of your color choice
Newspaper, scrap paper
Safety goggles
Pliers
cut wood ( read directions first!)


1. Start with your nice, clean frame. Turn it over and remove the backing, any staples, cardboard and glass. Also, if you have any cracks in the frame, now is the time to glue the pieces with wood glue and set it aside for 24 hours before doing more.

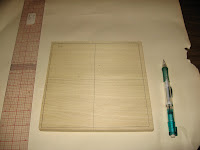
2.After you take the everything off the back of the frame, measure the inside of the frame, as well as the depth, for instance, this frame measures 8x8 in and is 1/4" deep. You can then go to your local lumber yard ( I went to Metropolitan Lumber and Hardware in SoHo, NY) and get a piece of wood cut with the correct dimensions. My piece of wood cost less than a dollar, so this definetely won't break the bank!

3. Next, you will want to make marks on your wood, so you can find out where you will want to put the screw in. I did a graph of quarter inches. It doesn't really matter if you can't get everything really straight, as long as it's pretty lined up, it's okay. Afer you make all your marks, check off where you would like the screws to go. You can put the jewelry you will be displaying on the wood, to make sure you have enough space in between. Then you can mark off in dark X's where you would like to drill.

4. Depending on the size of the screw, make sure that your drill bit is a bit smaller than the size of your screw. Also, depending on the type of jewelry you have, you may want to make the screw go horizontally, or if you choose to make it go vertically, make sure to snip the back part, so the earrings will be easy to take on and off the display.

5. Now, for the fun part! With safety goggles on, carefully drill each X you marked on the wood. Erase the pencil marks that you made on the wood, as you don't need them anymore. Then insert each screw. They should be very snug in the hole. You might need to use pliers to tighten them into the wood.

Next, you 'll want to place the frame face down and apply a good amount of wood glue on the inside. Place the wood with the screws face down on the frame. It will take about 24 hours for the glue to dry completely, so place a few weights or books on the back of the frame and wood, so it can really be bonded.


6. After the glue dries, you're almost done! All you need to do is spray paint the front, sides and back with the color of your choice. Spray a few coats and finish off with a few coats of clear varnish and you're done!

You have a nice jewelry display for selling your wares!

September 4, 2008

Displaying Jewelry in the Home


As a seller, I've had to come up with interesting ways to display my jewelry at craft shows. Using pieces that tied in with my style of work, it makes the whole presentation more cohesive and visually pleasing. Displays don't have to cost a lot either - here are samples of my displays that can easily be incorporated in the home:


Earring Display
Using a vase and bendable branches found at a craft supply store. Wiry florals will work too, depending on what look you're going for. I've also used real branches and gave them a few coats of fixative to seal it. You can fill the vase with either rice or sand to weigh it down.

Necklace Display
I also found this frame at a local craft store. You can scour thrift stores and flea markets for interesting frames. This is a 16"x20" frame that I lined with corkboard and a layer of white fabric. I used straight pins to hold up my necklaces.

Matboard Necklace Display
If you're really on a tight budget, this will work in pinch. I cut out a shape that I liked, made a couple of slits at the top to hold the necklace chains, painted it chocolate brown, and glued a flap in the back to prop it up. Voila!

I hope you've been inspired to create your own unique displays!

-Nguyen
knitknit.etsy.com