Showing posts with label instructions. Show all posts

November 26, 2008

NYC T-Shirt Bag


Reusable bags are all the rage now—and I hope this trend lasts.
Here's a little tutorial that will show you how to turn an iconic NYC T-shirt into a handy little reusuable shopping bag with a sophisticated textured touch. I love looking through this book and I always jump at the opportunity to try her techniques.
So here goes!

You will need:
• NYC T-shirt
• A scrap of red fabric (knit or woven) approximately 5"x9" (the bigger the fabric, the more texture you will get)
• A scrap of interfacing the size of the heart on the T-shirt.
• A needle & thread
• Pins
• An Embroidery hoop
• Access to an iron and a sewing machine


Begin by laying your T-shirt out on your work surface. (And yes, I'm in New York, so the floor is frequently my work surface.) Cut off the sleeves (including the seams) of the T-shirt. Fold the shirt down the middle (lengthwise) and cut off the collar. This will leave you with a sleeveless V-neck T-shirt. Lay the shirt flat again and cut off the bottom 5". (These scraps make excellent dust rags!) Now on to the applique part.

Iron the interfacing over the heart on the wrong side of the T-shirt. Cut your red fabric into a very rough heart shape. It should be considerably larger than the heart on the shirt. Turn the edge of red fabric under approximately 1/4" (iron, if you wish), center it on the heart and pin it down in four places (top/bottom/sides). Center the heart in your embroidery hoop, thread your needle and get ready to sew. Applique the red fabric shape around the edge of the heart using a short running stitch. Because the red shape is bigger than the heart, you will have to gather it slightly as you go by taking bigger stitches through the red shape and shorter stitches along the edge of the heart. You will have a funny puffy shower cap/mushroom shape attached to your shirt when you are finished.

Now the furrowing begins! Start from the back and bring your needle up through the center of the heart and the center of the red shape. Pull the thread taut and then push your needle back down in almost exactly the same spot. You have now tacked down the center of the puffy cap. Move to another area approximately 1" away and repeat the process of sewing up through the shirt and the fabric shape and then down in the same space. Again, move to another area of the heart approximately 1" away and make another stitch. Keep in mind that you are trying to go up through two layers of fabric and then back down through two layers. You will continue to do this across the whole surface of the heart, creating little wrinkles and furrows as you go. I would recommend keeping your stitches far apart initially to help keep the big furrows relatively evenly spaced then work within these smaller sections. Continue to make stitches randomly around the heart until you are happy with the furrowed texture. The back of the heart will be a glorious mess of zig-zagging stitches.
There's no real right or wrong way to. The beauty is in the irregularity of the wrinkles.

Next, turn your shirt inside out and lay it flat again. Pin and sew the bottom edge together. Open the seam flat (and facing up). Measure 3" from each corner of the seam and mark a line that is perpendicular to that bottom seam. Pin and sew along these lines. Trim the seams and turn your new bag right side out.

If you want to make your bag even fancier, you can A) hem the handle edges (doable with a sewing machine & super-easy with a serger), B) applique another heart on the back to cover your stitches, C) cut a cardboard rectangle from an old box to create a flat bottom for your bag.


Now I'm off to the farmer's market to pick up my last minute Thanksgiving supplies!
Tanya
www.luckx4.etsy.com

October 16, 2008

Super Easy Brown Sugar/Lavender Scrub!

I cook the same way I sew... Recipes and patterns are really just a guideline! This would explain why I am not a chef OR a seamstress ;) I did a lot of research on homemade scrubs a while back when i was thinking of fun bridesmaids gifts. This is the concoction that I came up with. It is so easy to make. I used all organic ingredients where I could, but most of the needed things are already in your kitchen. Your skin will be very smooth and smell like lavender.. ahhhh!


Brown Sugar/Lavender Scrub Ingredients

2 cups brown sugar (I used organic.. it is a bit chunkier)
1 cup sea salt
1/2 cup oil (You can mix olive and canola if you'd like. I used all olive oil and it can smell a bit "salad-y")
1 Tbsp Vitamin E oil
1 Tbsp Lavender essential oil

•••••

mixing bowl
spatula
container for finished scrub. (I used a re-sealable mason jar. It is nice to use for a gift... you can tie a ribbon around it, or design a label for the top if you're feeling ambitious!)

••••••••••••••••••••

1. Combine the brown sugar and sea salt in a bowl.


2. Once these are combined nicely, add the oil. Once those are all mixed together add the Vitamin E oil and Lavender oil.


3. Put your finished scrub into your container and enjoy!


Be careful in the shower because the oil can make the tub a bit slippery.

October 9, 2008

How to Make a Great Jewelry Display for Selling

Okay, I have had about half a dozen jewelry displays in my short lifetime and none of them really impressed me or made my jewelry stand out. I even had the opportunity to have nice designer busts and whatnot, which I then spray painted black, thus ruining them. I also don't like felted displays because I have a very large cat, so hair gets everywhere, even in closed spaces.

I really looked high and low for something affordable, portable and pretty to display my jewelry when I am selling and decided to just make my own jewelry displays! I make more earrings than anything, so I was focused on something that could display my earrings in one or two places and not make my table look too junky.

I came up with picture frames! They are in every thrift store, and with my simple instructions, they can make really nice displays for your jewelry. Also, if you really like a frame to something and it's not a picture frame, say a mirror, the instructions are the same.


I actually liked the pattern on this mirror so much, I decided it would make a great display. I got in from Salvo for around $4. Make sure the frame is in good condition, if not, it's okay to use it, you'll just have to take some extra steps in the middle of this how-to. You should also choose a frame that is pretty unique and will have a pattern or dimension that you will be able to see behind a few coats of spray paint.


Here's what you will need:

a picture frame or mirror, whatever size you can handle
1 can of clear varnish
a ruler or measuring tape
wood glue
screw in hooks ( you can get it from metalliferous or a hardwear store )
elmer's wood glue
a drill and drill bit ( a dremmel or flex shaft will work too)
a set of 2lb weights or heavy books
a great pencil
an eraser
spray paint of your color choice
Newspaper, scrap paper
Safety goggles
Pliers
cut wood ( read directions first!)


1. Start with your nice, clean frame. Turn it over and remove the backing, any staples, cardboard and glass. Also, if you have any cracks in the frame, now is the time to glue the pieces with wood glue and set it aside for 24 hours before doing more.

2.After you take the everything off the back of the frame, measure the inside of the frame, as well as the depth, for instance, this frame measures 8x8 in and is 1/4" deep. You can then go to your local lumber yard ( I went to Metropolitan Lumber and Hardware in SoHo, NY) and get a piece of wood cut with the correct dimensions. My piece of wood cost less than a dollar, so this definetely won't break the bank!

3. Next, you will want to make marks on your wood, so you can find out where you will want to put the screw in. I did a graph of quarter inches. It doesn't really matter if you can't get everything really straight, as long as it's pretty lined up, it's okay. Afer you make all your marks, check off where you would like the screws to go. You can put the jewelry you will be displaying on the wood, to make sure you have enough space in between. Then you can mark off in dark X's where you would like to drill.

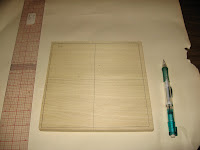
4. Depending on the size of the screw, make sure that your drill bit is a bit smaller than the size of your screw. Also, depending on the type of jewelry you have, you may want to make the screw go horizontally, or if you choose to make it go vertically, make sure to snip the back part, so the earrings will be easy to take on and off the display.

5. Now, for the fun part! With safety goggles on, carefully drill each X you marked on the wood. Erase the pencil marks that you made on the wood, as you don't need them anymore. Then insert each screw. They should be very snug in the hole. You might need to use pliers to tighten them into the wood.

Next, you 'll want to place the frame face down and apply a good amount of wood glue on the inside. Place the wood with the screws face down on the frame. It will take about 24 hours for the glue to dry completely, so place a few weights or books on the back of the frame and wood, so it can really be bonded.


6. After the glue dries, you're almost done! All you need to do is spray paint the front, sides and back with the color of your choice. Spray a few coats and finish off with a few coats of clear varnish and you're done!

You have a nice jewelry display for selling your wares!

September 30, 2008

Organization: Fabric Board How-To


I prefer hand written lists. There's a greater likelihood of getting things done if I actually see and read my lists. In my kitchen there's a perfect spot for a fabric board where I can post my to lists.

Here's a tutorial on how to make a simple fabric board for your kitchen or any other part of your home or office.

Materials
Foam board 1/2" thickness, cut to desired size
Medium to heavy weight fabric, larger than the board by atleast 2" all around
Heavy duty stapler with 1/4" staples*
2 sets of sticky magnets
*Depth of staples should be thinner than foam board thickness so they do not protrude.

Instructions

1. Place Board in center of fabric
2. Hold top center of board and pull fabric tight towards you. While holding fabric staple across the top.

3. Flip board and repeat for opposite side.
4. Peel backing from 2 sticky magnets and place below stapled sides, one at the top and bottom.

5. For remainder, choose a side. Tuck and fold fabric neatly at corner edges, while pulling tightly on slight angle downwards and towards center of board.
Staple from top to bottom of board maintaining a tight hold as you staple. Adjust and tuck fabric as necessary.

6. Repeat step 5 for remaining side.

7. Attach 2 remaining magnets to the ones already on board. Peel the backing and hang finished board in desired location.