Showing posts with label jewelry-making. Show all posts

December 19, 2009

Holiday Necklace Revival: How-To Rethread a Broken Necklace

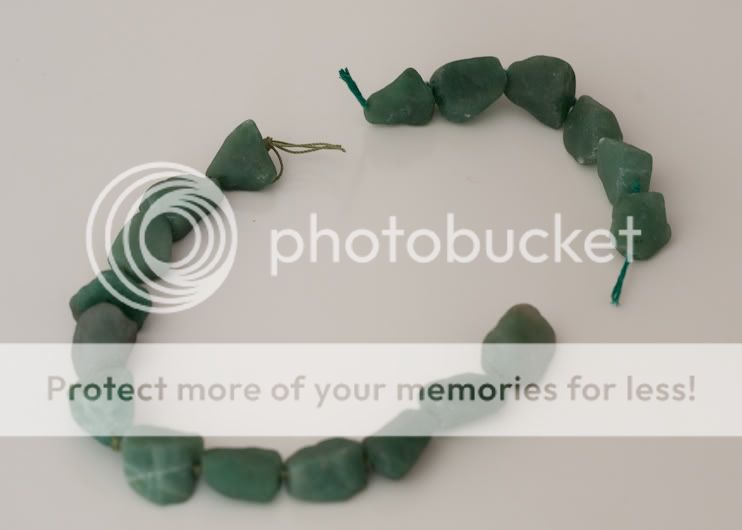
I found my favorite chunky necklace in Barcelona. It was the perfect souvenir to carry on the memory of a great visit to one of the most beautiful cities in the world. While pleased with my purchase, I knew that it was only a matter of time before fashion tragedy would strike, and the necklace would buckle under its own weight. That day came sooner than expected, only three months into the purchase.

This holiday season, I decided to give myself the gift of handmade and bring my beloved Spanish necklace back to life. I was surprised to learn that rethreading a broken-down chunky necklace is simple, inexpensive and actually a lot of fun.

To do so, you'll need the following supplies:
1. thick silk thread
2. a pair of scissors
3. tweezers
4. a small piece of thin wire, of similar thickness to the thread
5. necklace closures
6. the original necklace pieces, or in this case rocks, that comprised the necklace.

Step 1: You start by measuring a piece of thread that is five times the length of the necklace. Once you have measured out this piece and cut it, take it and fold it in half and then, fold it in half once again.

Step 2: Pass the piece of silver wire through the folded end of the thread, fold it in half over the thread and then twist it so that it doesn't slide around, but rather clasps this end of the thread. Make sure that once folded the wire is longer than the length of your longest necklace piece. This will ensure that if anything gets stuck, you can use the tweezers to pull on the wire and ultimately pull the thread through.

Step 3: Take the other end of the thread and double knot it to the first half of the necklace closure. You are now ready to start rethreading the original necklace pieces.

Step 4: Insert the wire through the necklace piece and pull the thread through. Pull the thread through until the necklace piece reaches the knot on the other end of the thread. Pushing the necklace piece down against this knot, create a knot on the other side of the piece as close to it as possible. If the knot is too small such that it slides through the necklace piece, make it a double knot. The closer this knot is to the necklace piece, the better the necklace will look in the end.
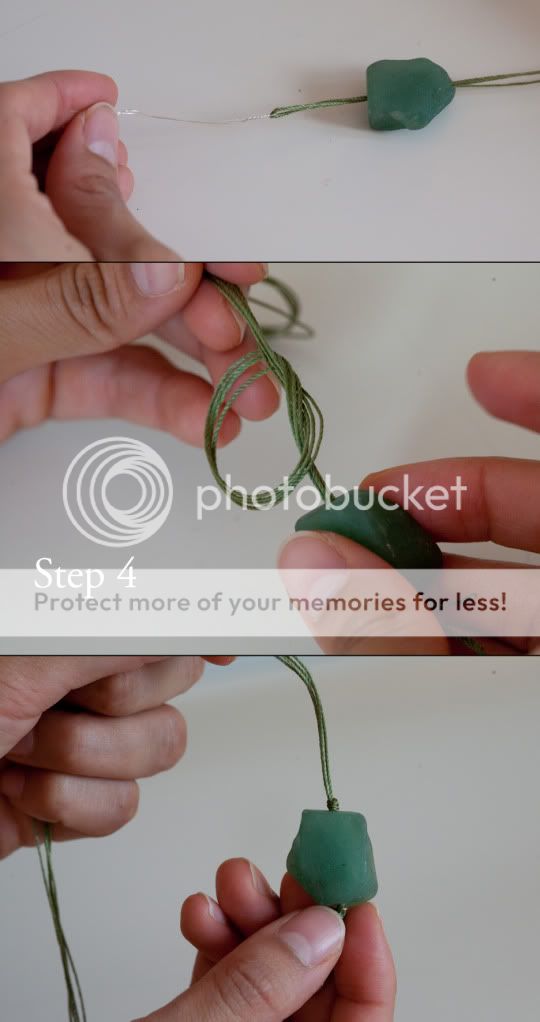
Step 5: Repeat step four until you run out of necklace pieces. Once you have created the last knot or double knot to keep the last necklace piece in place, tie a double knot around the second part of the necklace closure.

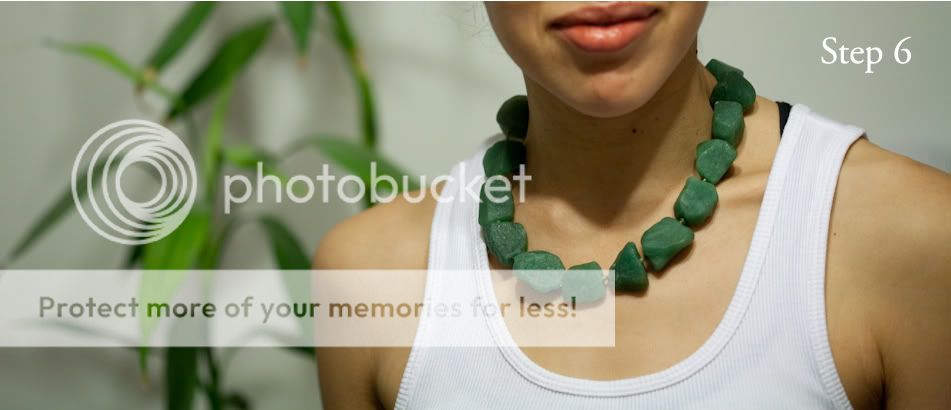
Step 6: Wear your refurbished necklace and enjoy the fruits of your own handmade labor. Happy Holidays!

This how-to was brought to you by Fernando Jewelry, a NYC-based independent jewelry company specializing in handcrafted sustainable jewelry and jewelry repair.

Photos by Florian Hoenig

- Karla Quintero
Fernando Jewelry
LuisFernando.etsy.com

March 16, 2009

Tutorial: Use Heat Transfer Foil to Create a Stylish Laminated Pendant

This tutorial will show you how to create a super stylish pendant using heat transfer foil and watercolor paints to embellish a photocopy. In the spirit of the DIY Wedding idea, I decided to ask my friend Phil Guie to draw an image for his girlfriend, my friend and fellow NewNew team member Kari Love, something that he knew she would find very romantic. I took Phil's drawing, an adorable depiction of the eternal love between the Unicorn and the Narwhal, and put a frame around it, then shrunk it down to the right size to be worn as a necklace. With no further ado, here are all the steps you will need to follow to make a shiny, uniquely romantic laminated pendant for the one you love.

Step #1: Assemble Your Materials! You might not have all of the materials for this project just lying around, but the're all things that are good to have on hand and should come in handy for millions of future projects.


Materials:
1. Black-and-white photocopy of an image you would like to make into a pendant. A black-and-white laser print should also work. It's fine to make your copies on regular 20 lb copy paper.
2. Gold foil joss paper or other decorative paper for the back of the pendant.
3. Heat Set Laminate Pouches, 10 mil thickness. You should use small pouches, such as those made to laminate business cards, for this project, because when you are laminating small items, a small pouch is less likely to trap ugly air bubbles that will cause you trouble.
4. A regular home iron.
5. Metallic heat transfer foil. Transfer foil can be purchased in New York City at the Pearl Paint Craft Center on Lispenard St. or online at one of my favorite suppliers, Dharma Trading Co.
6. 1/16" eyelets and an eyelet setting tool. 1/16" eyelets can be hard to find. I ordered mine online from this company.
7. A 1/16" hole punch. You can find these at most art supply stores.
8. A hammer.
Things not pictured that you will also need: A glue stick, scissors, Metal jump rings, and a necklace chain to put your pendant on.
And, finally, you will need access to a laminator.


Step #2: Transfer the foil onto your image. Set your iron to the Cotton setting, no steam. Place the foil on top of your photocopy with the shiny side facing up. The foil should transfer after a few seconds of heating with the iron. After you peel the foil sheet off of your image you may want to gently rub the image with a finger to make sure all the foiled lines are clean and crisp.

The photo below shows the copied drawing pre- and post-foiling.

Step #3: Make your image beautiful by painting with watercolors. You could also color it with colored pencils or markers.

Step #4: Glue your image to the back of the joss paper so that the back of your pendant will be an attractive gold color instead of just white. Any decorative paper or magazine image will work to make an attractive back for your pendant.

Step #5: Cut your image down to its final size.

Step #6: Laminate your image. You can laminate multiple pendants together, but you should leave around 3/8" of space between them to make sure the laminate seals completely around each one.


Step #7: Cut your pendant out, leaving about a 1/16" seal of laminate all the way around.


Step #8: Make a hole with your 1/16" punch. For rectangular pendants, it helps to measure and make sure your hole is in the center so that the pendant hangs straight.


Step #9: Insert an eyelet into the hole and set it with the eyelet setting tool and a hammer.

Step #10: Add a jump ring, slip your pendant onto a chain, and give it to the one you love!


February 25, 2008

Swarovski Crystal - A Short Note.

Besides reputation and wonderful marketing, Swarovski crystal is highly sought after over all other cut precision-cut crystal beads for their perfection in cut, clarity, and beauty.

The Swarovski Group (the "Company") was founded by Daniel Swarovski, an Austrian with a Polish last name, in Austria, when he was the first to create an automatic precision crystal cutting machine in 1892.

Also, the Company came to produce and still produces top-notch optical products (i.e., binoculars and telescopes), abrasives and grinding tools for the cutting and manufacture of crystals.

To maximize refraction, Swarovski crystals contain about 32% lead. However, in order to create a crystal that allows light to refract in a greatly enhanced rainbow spectrum, Swarovski coats some of its crystals with special metallic chemical coatings. Aurora Borealis ("AB") is one that is seen most often, and it gives off an enhanced rainbow effect on the half where the coating was applied. Other coatings include Dorado, Crystal Transmission, Volcano, and Aurum. Metallic coatings may be applied to only part of an object, as is the case with AB; others are coated twice, and thus are designated AB 2X, Dorado 2X, and so on.

Today, Swarovski beads are not only sold for jewelry-making, but their fame brought them into the realm of haute-couture, James Bond movies, international film celebrities and Oscar night fashion talk. Just go to the following URL to see such an example from an Oscar night: http://www.swarovski.com/content/10007.32553/Web_US/en

In 1973, the Company produced a paperweight and a key ring, as memorabilia for the 12th Olympic Winter games, which were then held in Innsbruck, Austria.

In 1974, designer Max Schreck 'accidentally' started a new product line when he created a tiny mouse out of chandelier parts. That tiny mouse was followed by a series of Swarovski crystal animals and decorative items, among them were the famous Swarovski crystal lovebirds.

Today, Swarovski's figurine collection Silver Crystal is another major branch of the Company.

In 1995, the Company celebrated its 100th anniversary, by building a magnificent theme park that was named, Swarovski Crystal Worlds ('Kristallwelten') in Wattens, Austria. That park was designed by the artist, André Heller, and it takes you into a land of incredible imagination and beauty, not to mentkion the exceptional park landscape which one has to see to really appreciate. Just go to the following URL to see what such park's outside landscape looks like: http://www.laurin.at/en-umgebung-swarovski_kristallwelten.shtml

The Company doesn't just produce the most sought after crystal in the world, but they also have collections for each season. To see the collection for Spring/Summer 2008, please go to the following URL: http://www.swarovski.com/content/10007.19128/Web_US/en

In 2007, the Company launched the product brand website, www.crystallized.com, which provides information and inspiration for people to design with Swarovski crystal beads.

CRYSTALLIZED™ - Swarovski Elements is the new product brand for Swarovski crystals, which come in a variety of sizes, shapes and colors. Products with Swarovski crystals are labelled 'Made with CRYSTALLIZED™ - Swarovski Elements', which is a guarantee of the originality of the Swarovski crystals used in the creations by jewelry designers on a small scale and by international fashion houses that use Swarovski crystals.

The Company encourages independent jewelry designers, interior designers, and all other designers who can incorporate their crystal into their product to utilize Swarovski crystals for unique creations throughout the world.

To learn more about Swarovski crystals or to join the Swarovski Crystal Society ("SCS Sociey"), please go to the company site at: www.swarovski.com

February 20, 2008

Tip of The Day For Jewelry-Makers

I'm sure that many of you have invested once or more than once for the necessary pliers needed in many jewelry-making projects by buying them directly from a bead shop or a jewelry supply store, and I'm sure that you were many times disappointed with not only the price but the quality. However, there is an alternative. Kmart's tool center!

A couple weeks ago, I was looking around the Kmart aisles, and I came across a set of pliers, which, although do not look like the ones that one is taught to work on jewelry with, are excellent for wire-wrapping and such.

If you go to Kmart's online store, the product is called "COMPANION 4 pc. Mini Pliers Set" for $9.99. However, I was able to purchase the exact same set of pliers from Kmart a couple weeks ago directly from a Kmart shop for just over $7. So, I recommend that you purchase directly from a Kmart store instead of online, which also saves on shipping costs.

The cutter of the aforementioned set is amazing! It works so well.

One just needs to get over the fact that the tools are not of the same exact look as typical jewerly-making ones. The only type of plier that is not in that set is the long round nozzle one, for which I have not seen a version outside of jewelry supply shops yet, but I will keep my eyes open for it.

If you want to order the above mentioned plier set online from Kmart, just go to: http://www.kmart.com/shc/s/search_10151_10104?storeId=10151&catalogId=10104&keyword=pliers and select the "COMPANION 4 pc. Mini Pliers Set."

Not only are those above mentioned pliers CHEAPER than what jewelry supply places offer, but they WORK BETTER. I'm thrilled about how well they work, and it has cut some time out in terms of how long it takes me to wire-wrap a pair of earrings tightly closed.

In sum, I hope that this little tip proves to be helpful to many.

Best Regards to All!

Anna (a.k.a. Ania)
(of http://www.honorata.etsy.com/ and http://www.beryluniverse.etsy.com/ and http://www.ankasupplies.etsy.com/)

February 16, 2008

Jewelry Workshop at Etsy Part 2


BrooklynButterfly.Etsy.com and I headed back to The Etsy Labs last weekend for the second part of our jewelry workshop.

It was awesome, Danielle taught us the fundamentals of soldering with a torch, as well as annealing and pickling. We made this super awesome feminine ring. I couldn't stop staring at it, I love it :)

Though I was a bit dangerous with the torch in hand - Angie was really great! She forwarded me some other pieces that she made at previous workshops at Etsy.


COOL - right?! Hopefully they will offer some more instruction, as I don't think I am ready for a full set up in my apartment at the moment.

-Kimm aka KimmChi.Etsy.com

February 5, 2008

Jewelry Workshop at Etsy


On February 3rd, Etsy Labs had a beginner's jewelry workshop with Danielle, aka PreciousPups.Etsy.com which I attended with about five other women. I got to meet some great ladies - one of whom, was BrooklynButterfly.Etsy.com, another member of The {NewNew} Street Team (it was great to meet you!).

I do some jewelry on the side but really wanted to brush up on my technique - and this class was perfect for that. Danielle went over the basics of wire working, wrapping and polishing using the flex shaft. I learned that a bic pen is the perfect size to form ear wires and that I need to get myself some polishing compound! I go back next week for a mini workshop on soldering and the torch - I can't wait!

-Kimm
aka KimmChi.Etsy.com