September 30, 2008

Organization: Fabric Board How-To


I prefer hand written lists. There's a greater likelihood of getting things done if I actually see and read my lists. In my kitchen there's a perfect spot for a fabric board where I can post my to lists.

Here's a tutorial on how to make a simple fabric board for your kitchen or any other part of your home or office.

Materials
Foam board 1/2" thickness, cut to desired size
Medium to heavy weight fabric, larger than the board by atleast 2" all around
Heavy duty stapler with 1/4" staples*
2 sets of sticky magnets
*Depth of staples should be thinner than foam board thickness so they do not protrude.

Instructions

1. Place Board in center of fabric
2. Hold top center of board and pull fabric tight towards you. While holding fabric staple across the top.

3. Flip board and repeat for opposite side.
4. Peel backing from 2 sticky magnets and place below stapled sides, one at the top and bottom.

5. For remainder, choose a side. Tuck and fold fabric neatly at corner edges, while pulling tightly on slight angle downwards and towards center of board.
Staple from top to bottom of board maintaining a tight hold as you staple. Adjust and tuck fabric as necessary.

6. Repeat step 5 for remaining side.

7. Attach 2 remaining magnets to the ones already on board. Peel the backing and hang finished board in desired location.


September 29, 2008

Monday Giveaway - Fall necklace


It's MONDAY! Which means its time for our brand new Monday Giveaway. Each and Every Monday Stop by to enter to win something fabulous from members of The {NewNew} York Etsy team. This Monday we are proudly giving beautiful fall inspired necklace by third floor designs

The necklace starts with a vintage brass circle. Vintage enameled and lucite flowers are securely wire-wrapped with Swarovski crystals at their center. Hung from a dainty Italian gold-plated chain and secured with a gold-plated lobster claw. The necklace measures 16” with a 1” drop. This necklace is a perfect, go-with-everything accessory!


Beth, the creator behind Third Floor Designs, has been designing and crafting since she was ten. Her line - including wraps, scarves, bags, belts and jewelry - uses vintage and contemporary materials to create unique women’s accessories. She is at her happiest surrounded by stacks of fabrics and the vintage beads, baubles and buttons that she has collected over the years.


How to Enter:

1. To enter to win, tell the world why you want this necklace
Post about your love of these cards and necklace and thirdfloordesigns on Myspace, Facebook, livejournal, wordpress, blogger, or your own personal blog or website.

2. Post a LINK back to your personal post right here in the comments section.


3. Entries can be submitted through 10pm Saturday, October 4, 2008.


4. Winners will be selected randomly and will be announced the following Monday with the New contest item.


5. To see the full legal contest rules click here.


Last weeks winner:

The winner of the notebook and cards from bluestitchbooks goes to marylin from pulpsushi
.
Congrats to the winner and I hope you all enter this week!
Can't wait to see your posts! And stay tuned for next week's giveaway.


~jen pepper
peppersprouts.etsy.com

September 27, 2008

Night Night at The {NewNew}

More wondrous nesting finds from the fabulous NewNew Team! Continuing with my dream night, I would settle myself in for a quiet evening in my bedroom.


One wall would have this beautiful painting by ArtbyIris.


I would climb into my big bed where I might have these pillows from bshorr ...


or this one from cakehouse.


I would love to write in this journal from collectiveelements.


Or maybe this one from SpinachNPeace.


Then I would read one of the trillion books that I keep by my bed, where my place would be kept by this bookmark from beaconbookmarks.


When my eyes got heavy, I would be turning out this fabulous light from YoursTrulyxoxox.


Night Night.

Beth

September 25, 2008

The {NewNew} THIS WEEKEND!!

Well, fall is definitely in the air, and though it may look to be a wet one, grab your umbrellas, and check out....
SATURDAY September 27 + 28 - find KarensMonsters taking a roadtrip up to Ithaca for the Apple Harvest Festival (monsters promise not to eat all the apples until after you get there...). Festivities will take place right in downtown Ithaca - see their site for more details, including festival hours.
Also Saturday and Sunday is your friendly neighborhood Brooklyn Indie Market with different vendors filling the tent each week at Smith and Union in Carrol Gardens. This week you can find decoupaged jewelry - made right here in the County of Kings by WabisabiBrooklyn, hip new fall skirts and ponchos - or skirt/ponchos from Fofolle and playful ceramics by MayLuk - just to name some of our featured artists who will be there this weekend.

SUNDAY September 28:
Drop by our booth at the Brooklyn Flea for silkscreened tee's, shirts and dresses by KimmChi, original artwork by AlleneLaSpina, illustrated cards by MShoelace, silkscreened dresses, shirts and bags by BetterThanJam and beautiful antique inspired jewelry by AdornmentsNYC.

G to Clinton/Washington. More directions here.

Also on SUNDAY is another ROADTRIP! This one to DC for the ever popular CraftyBastards! If you are down in DC - be sure to check out British Flashcards merch by CharlieandSarah and TheHandOfFatima will also be there with her eclectic jewelry line incorporating cameos, keys and other ephemera into romantic designs. Have fun you guys!

And most of all - STAY DRY!


-Kimm
KimmChi.etsy.com

Adventures in Storage

I've been living in the same apartment for 12 years. In that time I've become pretty good at living with one closet, one sink, one guitar-obsessed husband, 2 cats and lots of stuff. I wouldn't say I'm a pack-rat, but I'm certainly no minimalist.


I had always assumed that our place was about 750 square feet -- I think that's what the landlord told me and I just never bothered to check. So when my husband and I started looking for a place to buy, we finally measured our apartment and found that we had actually been living in 498 square feet. Overnight things seemed almost unbearably claustrophobic!

What a great time to start my jewelry business, salt & paper, quite literally on my kitchen table! Storage became a huge issue almost immediately and so I found what seemed to be the only space left in the entire apartment and put it to work. The 9 inch gap between my pots and pans and my kitchen cupboard became my bead library. I installed a 1" x 3" plank as a long shelf. The original plan was to recycle baby food jars, but that would have required our consuming a lot of baby food (sans baby) so I finally bit the bullet and ordered cases of empty plastic jars. I organized everything by color, and filled up the shelf. I also added a magnetic strip (used to hold chef knives) to keep all my tools at hand, and making it easier to spot when my husband "borrows" some pliers to restring a guitar.


And just when I got everything organized... we found a house.
Today we closed on our new house, which is just over twice the size of our current place!

-natalie
www.saltandpaper.etsy.com

September 24, 2008

Wall Display For Your Collectibles

One thing I love to do when I travel is to buy little handmade figurines of sorts that are unique to the country I am in. Whenever I go to Mexico, I see all types of brightly painted animals, suns, moons and angels made of wood that are so beautiful. I have been collecting these cultural souvenirs for a while now and after moving into my apartment a couple years ago, I decided it was time to properly display them. First, I picked a focal wall that grabs your attention right when walking into my apartment. This happens to be my dining room wall. Next was to add a splash of color that would be appropriate to my Mexican-themed wall. I picked this fabulous reddish-orange terracotta. I hung a hand-me-down Frida Khalo print that was already framed and used this as the center piece. I found these great black square shelves at Bed, Bath and Beyond that would be perfect for each collectible to have it's own "stage." I arranged the square shelves so there where three on each side of the print and positioned the different squares to create balance.

Then I selected which collectible would fit best in each square. I had to hang a couple of the items in the box (because they couldn't stand on their own) so they look like they are floating in the middle. I did this by using a tiny metal ring hook that screws into the shelf and hung it with fishing wire (all found at my local hardware store).

I love this wall and now I get so many compliments of my one-of-a-kind mementos.

-Misty
www.lapistolera.etsy.com

September 23, 2008

Fall Nesting


This is my first foray into the world of blogging….I feel like such a dinosaur in the world of technology. My favorite and best known piece of technology is my sewing machine…beyond that – it's unknown territory.

I’m a single (not soccer or gun-toting) mother, civil servant (yawn) and crafter who oftentimes feels overwhelmed by the technology and speed of this world. I would much rather spend my days sleeping late, napping after that, making the odd outfit or craft item, planting something in the garden, watering something else, or just watching them grow.

As fall moves in, I’m reminded that it’s the second of my least favorite seasons…the first being winter. As the chill moves in, I realize that I don’t have the right shoes or clothes for the transition. And after a few attempts at correcting this, I give up.

By then I’m moving into winter mode. I begin to spend more time at home, mostly in my room which begins to look like several strange creatures nest there. There are growing piles of fabric, trims, notions and other sewing and crafting paraphernalia. I can putter to my hearts content among my “nests” sometimes never finding what I know is there somewhere. But I take comfort in the warmth, knowing that I’m temporarily safe from the harsh winter winds blowing beyond my windows.

But then, alas spring comes, and I promise to organize my workspace like any normal person. And guess what, I start that process, only to have fall and winter come back again before I’ve completed the job. My nests return. Did someone say life’s a cycle? I wonder what they meant. This fall I hope to make many outfits and bags, lots of pillows, table runners, etc so that when spring comes, I’m ready for the street fairs.

Marilyn Ng-A-Qui
Vyphuisdesigns.etsy.com

September 22, 2008

The {newnew} gives away a bike... well sort of


It's MONDAY! Which means its time for our brand new Monday Giveaway. Each and Every Monday Stop by to enter to win something fabulous from members of The {NewNew} York Etsy team. This Monday we are proudly giving away a set of 4 bicycle notecards and a matching bicycle notebook from blue stitch books.

The set of 4 gocco printed retro throw back notecards are printed on orange card stock and each card measures 3.5" x 3.5". They are accompanied by 4 crisp, white envelopes. The bicycle wraps around to the back of the card for a little extra pizazz. The corresponding notebook is recycled, made from old dot matrix printer paper found in Jaime's parents' basement. Each notebook has about 20 sheets of paper and is sewn together on her trusty sewing machine. This is a great gift for the bicycle lover in your life!

Jaime, the beauty and brains behind Blue Stitch Books is a graphic designer who took a bookbinding class in college that changed her life. After giving away books to pretty much everyone she knew.. she decided to share her skills with the world. She has taken a step back from bookbinding, distracted by her shiny new gocco screen printing machine. Figuring out a way to incorporate traditional bookbinding, screen printing and her love of all things old and beautiful is what keeps her going.

How to Enter:
1. To enter to win, tell the world why you want this bicycle gift pack! 
Post about your love of these cards and notebook and bluestitchbooks on Myspace, Facebook, livejournal, wordpress, blogger, or your own personal blog or website.
2. Post a LINK back to your personal post right here in the comments section.
3. Entries can be submitted through 10pm Saturday, September 27th, 2008.
4. Winners will be selected randomly and will be announced the following Monday with the New contest item.

5. To see the full legal contest rules click here.


Last weeks winner:
The winner of the kitty from littleloveblue goes to giftbearer from http://artlifenewsblog.blogspot.com
Congrats to the winner and I hope you all enter this week!

Can't wait to see your posts! And stay tuned for next week's giveaway.

~jen pepper

September 21, 2008

Action/Abstraction: Pollock, de Kooning, and American Art, 1940-1976

I had the good fortune to see this truly excellent exhibition at The Jewish Museum, in New York City, yesterday!
I found it to be very exciting,inspirational and education.

Taken verbatim from The Jewish Museum's website, the following words best describes the content of the exhibit:
In Action/Abstraction: Pollock, de Kooning, and American Art, 1940-1976, the first major U.S. exhibition in 20 years to rethink Abstract Expressionism and the movements that followed, over fifty key works by 32 artists – among them Jackson Pollock, Willem de Kooning, Helen Frankenthaler, Mark Rothko – will be viewed from the perspectives of influential, rival art critics Clement Greenberg and Harold Rosenberg, the artists, and popular culture.

I thoroughly enjoyed the energy, movement and use of color in many of the paintings and sculptures on exhibit.
The De Koonings and Pollock's were tremendous!

It was especially good to see expert works by Lee Krasner (who was Jackson Pollock's wife & major promoter of his art); Grace Hartigan; Joan Mitchell and Lee Bontecou (former professor of mine). But, the exhibition as a whole was excellent. In addition to paintings, it included sculptures, videos and photographs.

I gained a sense of the importance and influence of critics, Clement Greenberg and Harold Rosenberg during the Abstract Expressionist period in art history.

This painting by Jackson Pollock is entitled, "Convergence," and is in the exhibition. It was created in 1952 and is copyrighted by the Pollock-Krasner Foundation.


This painting, "Fantasia," by Hans Hofmann, was created in 1943 and is on exhibit, as well.


This excellent exhibit ends today, unfortunately.
But a link to the Jewish Museum's website is here, for future reference.

The exhibition catalogue is called, "Action/Abstraction: Pollock, De Kooning, and American Art, 1940-1976" and was written by Norman L. Kleeblatt.
There is a paperback edition of this book.


by Nina Kuriloff

September 20, 2008

Gift Wrapping Irregular Shaped Gifts Without a Box


When it comes to gift wrapping irregular shaped objects, your best bet it to use your imagination. The above gift is actually a wine rack and a canister of utensils for a house warming for a soon-to-be married couple.


All I used here was corrugated cardboard paper, ribbons, tissue paper, and glue, and voila! A wedding cake gift wrap!

September 19, 2008

The {NewNew} on September 20 + 21

SATURDAY+SUNDAY
The Brooklyn Indie Market is open this weekend - Sat 11 to 7 and Sun 11 to 6.

Drop by to see what the skirt fairy will have for Fall with Fofolle's shop. Also with decoupage jewelry by WabisabiBrooklyn, ceramics by MayLuk and monsters plush toys, cards and pins by KarenMonsters.


SUNDAY:
Drop by our booth at the Brooklyn Flea for our last flea appearance for a little while by LittleTileGnome (get 'em while you can, this side of the Atlantic!) also with hand decorated tin albums and cards by WaiSze, abstract silkscreened totes and pillows form RedBridge, soy candles from
DewOnAPetalHome, handmade soap and lipbalm from NordeaSoaperie and beautiful handmade jewelry by Jantar.


G to Clinton/Washington. More directions here.


-Kimm
KimmChi.etsy.com

September 17, 2008

Displaying Your Loved Objects

I work as a prop stylist which means I have a good excuse for my pack-rat tendencies and all the junk that I collect. Since I don't live in a mansion, I have learned that all this stuff needs to get culled into little displays or I'm going to end up one of those people who gets crushed under their own possessions. No one wants that.

Here are a few table-top displays I have put together recently and some tips for creating your own.

still life in kitchen

This is a display that I had on my kitchen table about a year ago.

I like to start with a tray, a board or a large to doily to set a defined space for the display. Next, I grab all of my elements that I want to use. I set a color story: this one was green, blue and pops of white. I like to set the tallest element out first and arrange the other elements around that. In many of my table-top displays this tall piece ends up toward the back right of the tray. Most of the time, when everything is in the right place, it will all just feel "right".
Oh, and I also like to have some sort of art propped up or pinned behind the display to give it dimension.

autumn display

This is a display I made for fall of last year after I impulse-purchased a bunch of gourds. Note that the vase and tray are the same as the first display. You don't need to reinvent the wheel every time; sometimes you can swap out a few elements and change the whole look of a display. In this case I thought it was cool that the vase had a gourd shape but is man-made (and bright blue!). I added a few doilies in orange and yellow for a "soft" element. This display needed extra drama so I added some branches found in the park and trimmed them with fabric leaves and handmade needle-felted acorns.

tabledisplay

This is basically what's on my table right now. Of course, the gourds didn't last, so I swapped those out for a pretty bird, some new vases and a smattering of acorns. I wanted the display to be brighter so I swapped out the tray and added more pops of yellow. The little wood bowl doesn't usually live on the table but it looked really nice in the photo!

Here are some things to keep in mind when you are making displays:

*Set a defined space for you displays or they will start growing out of control!

*Balance "hard" elements (vases) with "soft" elements (linens).

*Set your tallest element off center and towards the back and then place other elements around it.

*Set a defined color story.

*Think of different ways to organize displays: by theme (birds, autumn), by color (red and white, yellow and blue), by shape (round, rectangular) or by material (wood, ceramic).

*"Play" with the display until it looks good to you. Setting a display is very intuitive and you will know when it looks right.


-Kayte
loveforever.etsy.com
thisisloveforever.com/blog

September 16, 2008

recycled bath mat

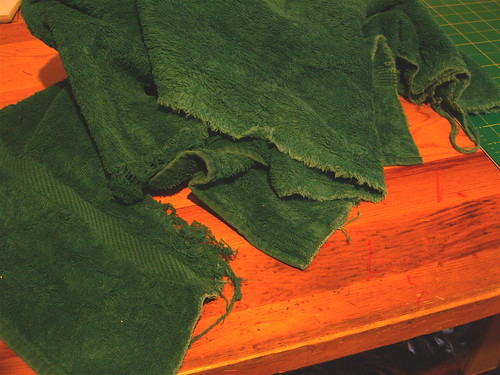
recently the towel that my husband has been using since college (!) sustained some injuries that made it unusable:
CIMG1043

unusable as a towel, that is. as the base for a new bath mat, it was perfect. and so i embarked on a project to dress up our bathroom.

materials:

- an old towel
- a yard or so of fabric that you'd like to place your just-out-of-the-shower feet on [i used the ruffle from an old bedspread]
- pins
- needle and thread, or sewing machine

method:

1) cut your towel into two equal-sized rectangles, at whatever size will fit best in your bathroom.

CIMG1055

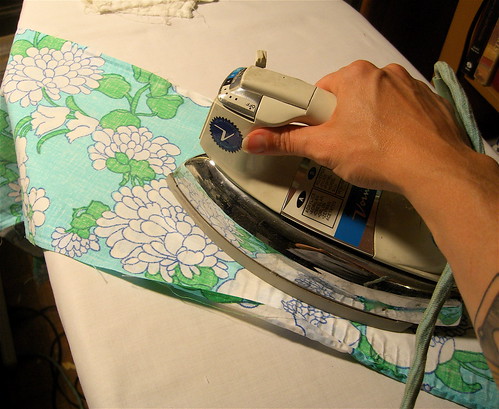
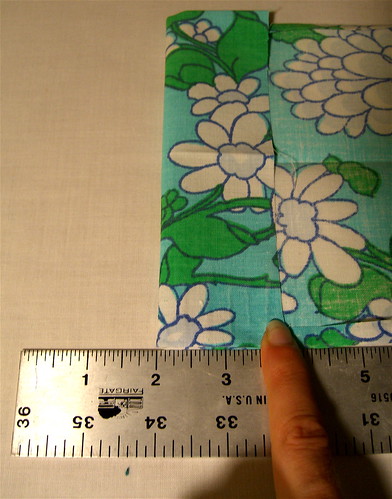
2) iron your fabric, and cut it into strips that are 4-1/2" wide, and 4" longer than the sides of your rectangle in length (so, unless you've cut squares out of your towel, you'll have 2 strips of one length and 2 strips of another).

CIMG1061

3) iron down a 1/4" fold on each of the long sides of the strips, then fold in half and iron the whole strip flat, until it looks like this:

CIMG1069

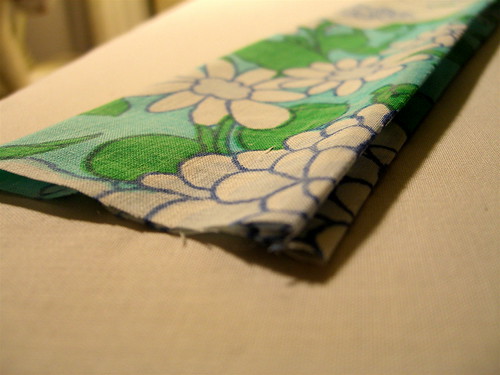
then fold back 2" at the short ends of each strip, and iron down.

CIMG1084

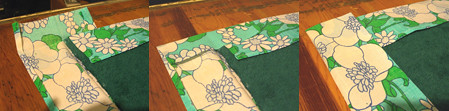
4) place the two rectangles of towel on top of each other, lined up neatly. then place the strips of fabric under the edges of the towels and fold them over at the crease that you ironed in, so that they create a border. follow the photos below to make neat corners:

bath_howto3

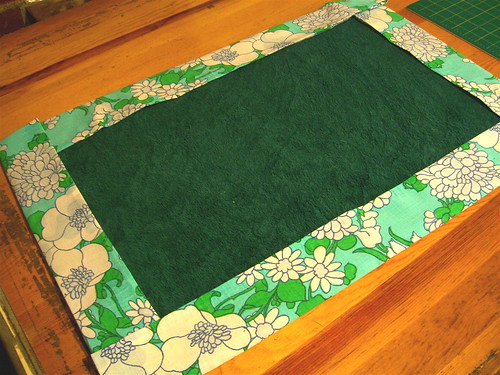
5) if you like the way it looks at this point, just sew a straight stitch along the inside edges of the border, being sure that you catch both the front and back edges, and you're all done!

CIMG1089


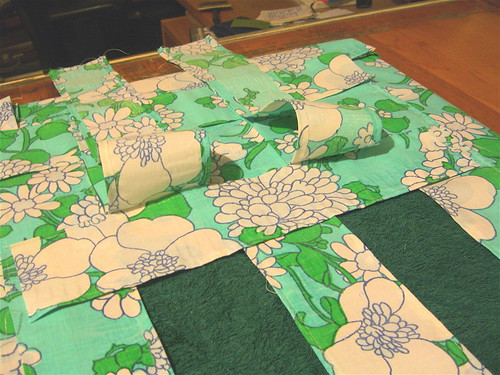
6) however if, like me, you're not crazy about the color of your towel, or just want more of the fabric in the design, or just want to make life more difficult for yourself, you can keep going. i decided to fill in the middle with a lattice design, like the back of an old lawn chair. if you are going to go this route, don't sew that broder fabric down just yet....

CIMG1064

start by cutting a bunch of strips of fabric in a width that looks appealing to you (i used 2"). remember to add a 1/2" to that width for finishing the edges. measure the open space of your mat that you need to fill, and figure out how many strips you need to cut to fill it. for length, cut them an inch longer than the open space, to allow for them to overlap (or, acutally, underlap) with the border fabric.

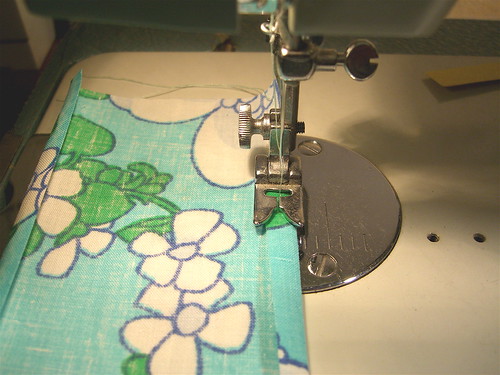
iron down a 1/4" on each of the long sides of the strips, then sew them down with a straight or zig-zag stitch.

CIMG1095

**if you are working with a fabric that's prone to fraying, add 1" to the width that you decide on for the strips, and fold the edges of the fabric over on themselves again before sewing down.

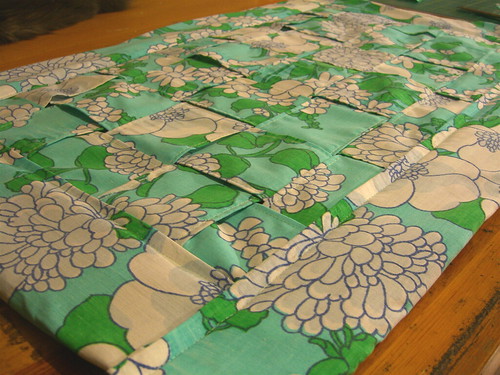
7) weave the strips together...

CIMG1098

...pin them around the edges, and baste them to the towels.

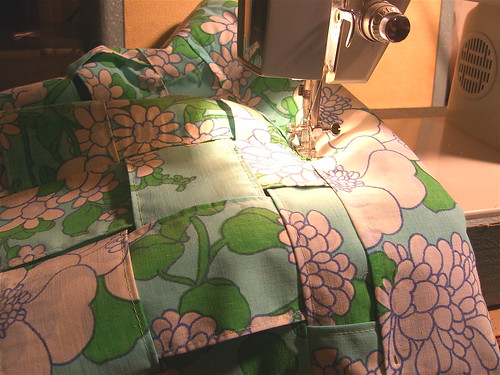
8) then put the border fabric back in place, fold it over the lattice, and pin it down. sew a straight stitch along the inside edges of the trim, being sure that you go through both the front and back edges.

CIMG1107

and that's all!

CIMG1117

- cakehouse